

If you love designing your website in Showit for it’s unique design capabilities and functionality, you’re going to love it even more once you explore the magic of WordPress Custom Post Types.
Ever get that notice in Showit that you have too many pages and that the performance of your site may be affected? Or maybe you get embarrassingly winded looking at all the pages in your Showit pages menu and can’t ever seem to find what you are looking for.
While I have yet to see any actual degraded site performance from having a lot of site pages in Showit, seeing this message might be a bit of a clue that you have a little too much going on inside Showit. This isn’t necessarily a bad thing, but it does mean that your site could be more organized and you could have Showit do less of the work. Not only that, the method I am about to show you will also save you a ton of time when it comes to creating new content.
Enter custom post types…
What Are WordPress Custom Post Types?
WordPress Custom Post Types are the answer to creating unique content types specific to your business, allowing you to expand your site beyond traditional blog posts and pages. Think of things like:
- projects
- testimonials
- case studies
- events
- venues
- products
For example, let’s say you are a photographer and want to feature a series of your recommended venues/locations that you shoot at. You can create a custom post type for your venues that include the name of the venue, a description and an image.
Or maybe you are designer with lot of client testimonials and you want to be able to organize them and categorize them and also be able to pull them in to various places throughout your site.
Using custom post types allows you to keep all your posts of a certain type organized in one central spot and easily update your site with new posts in the future without ever having to touch Showit once it’s all setup.
Why Combine WordPress Custom Post Types with Showit?
While Showit excels in creativity, WordPress is a master of content management. By integrating WordPress Custom Post Types with Showit, you can:
- Showcase Multiple Types of Content: Display different types of content on your website, making it more engaging and informative.
- Enhance User Experience: With Custom Post Types, you can organize and display your posts on any page and format them anyway you want so that they are cohesive with the rest of your design.
- Streamline Updates: You can manage content creation and updates for your Custom Post Types directly in WordPress, without altering the design in Showit.
While there is a bit of additional setup involved in creating a custom post type and you do need to be on the Advanced Blog plan for Showit, the effort is well worth it.
Step-by-Step Guide: Using WordPress Custom Post Types with Showit
Step 1: Create & Setup Your Custom Post Type in WordPress
In your WordPress dashboard, install the plugin “Custom Post Type UI“ (it’s free!) to create a new Custom Post Type. (Remember, you must be on the Advanced Blog plan for Showit, in order to be able to add custom plugins.)
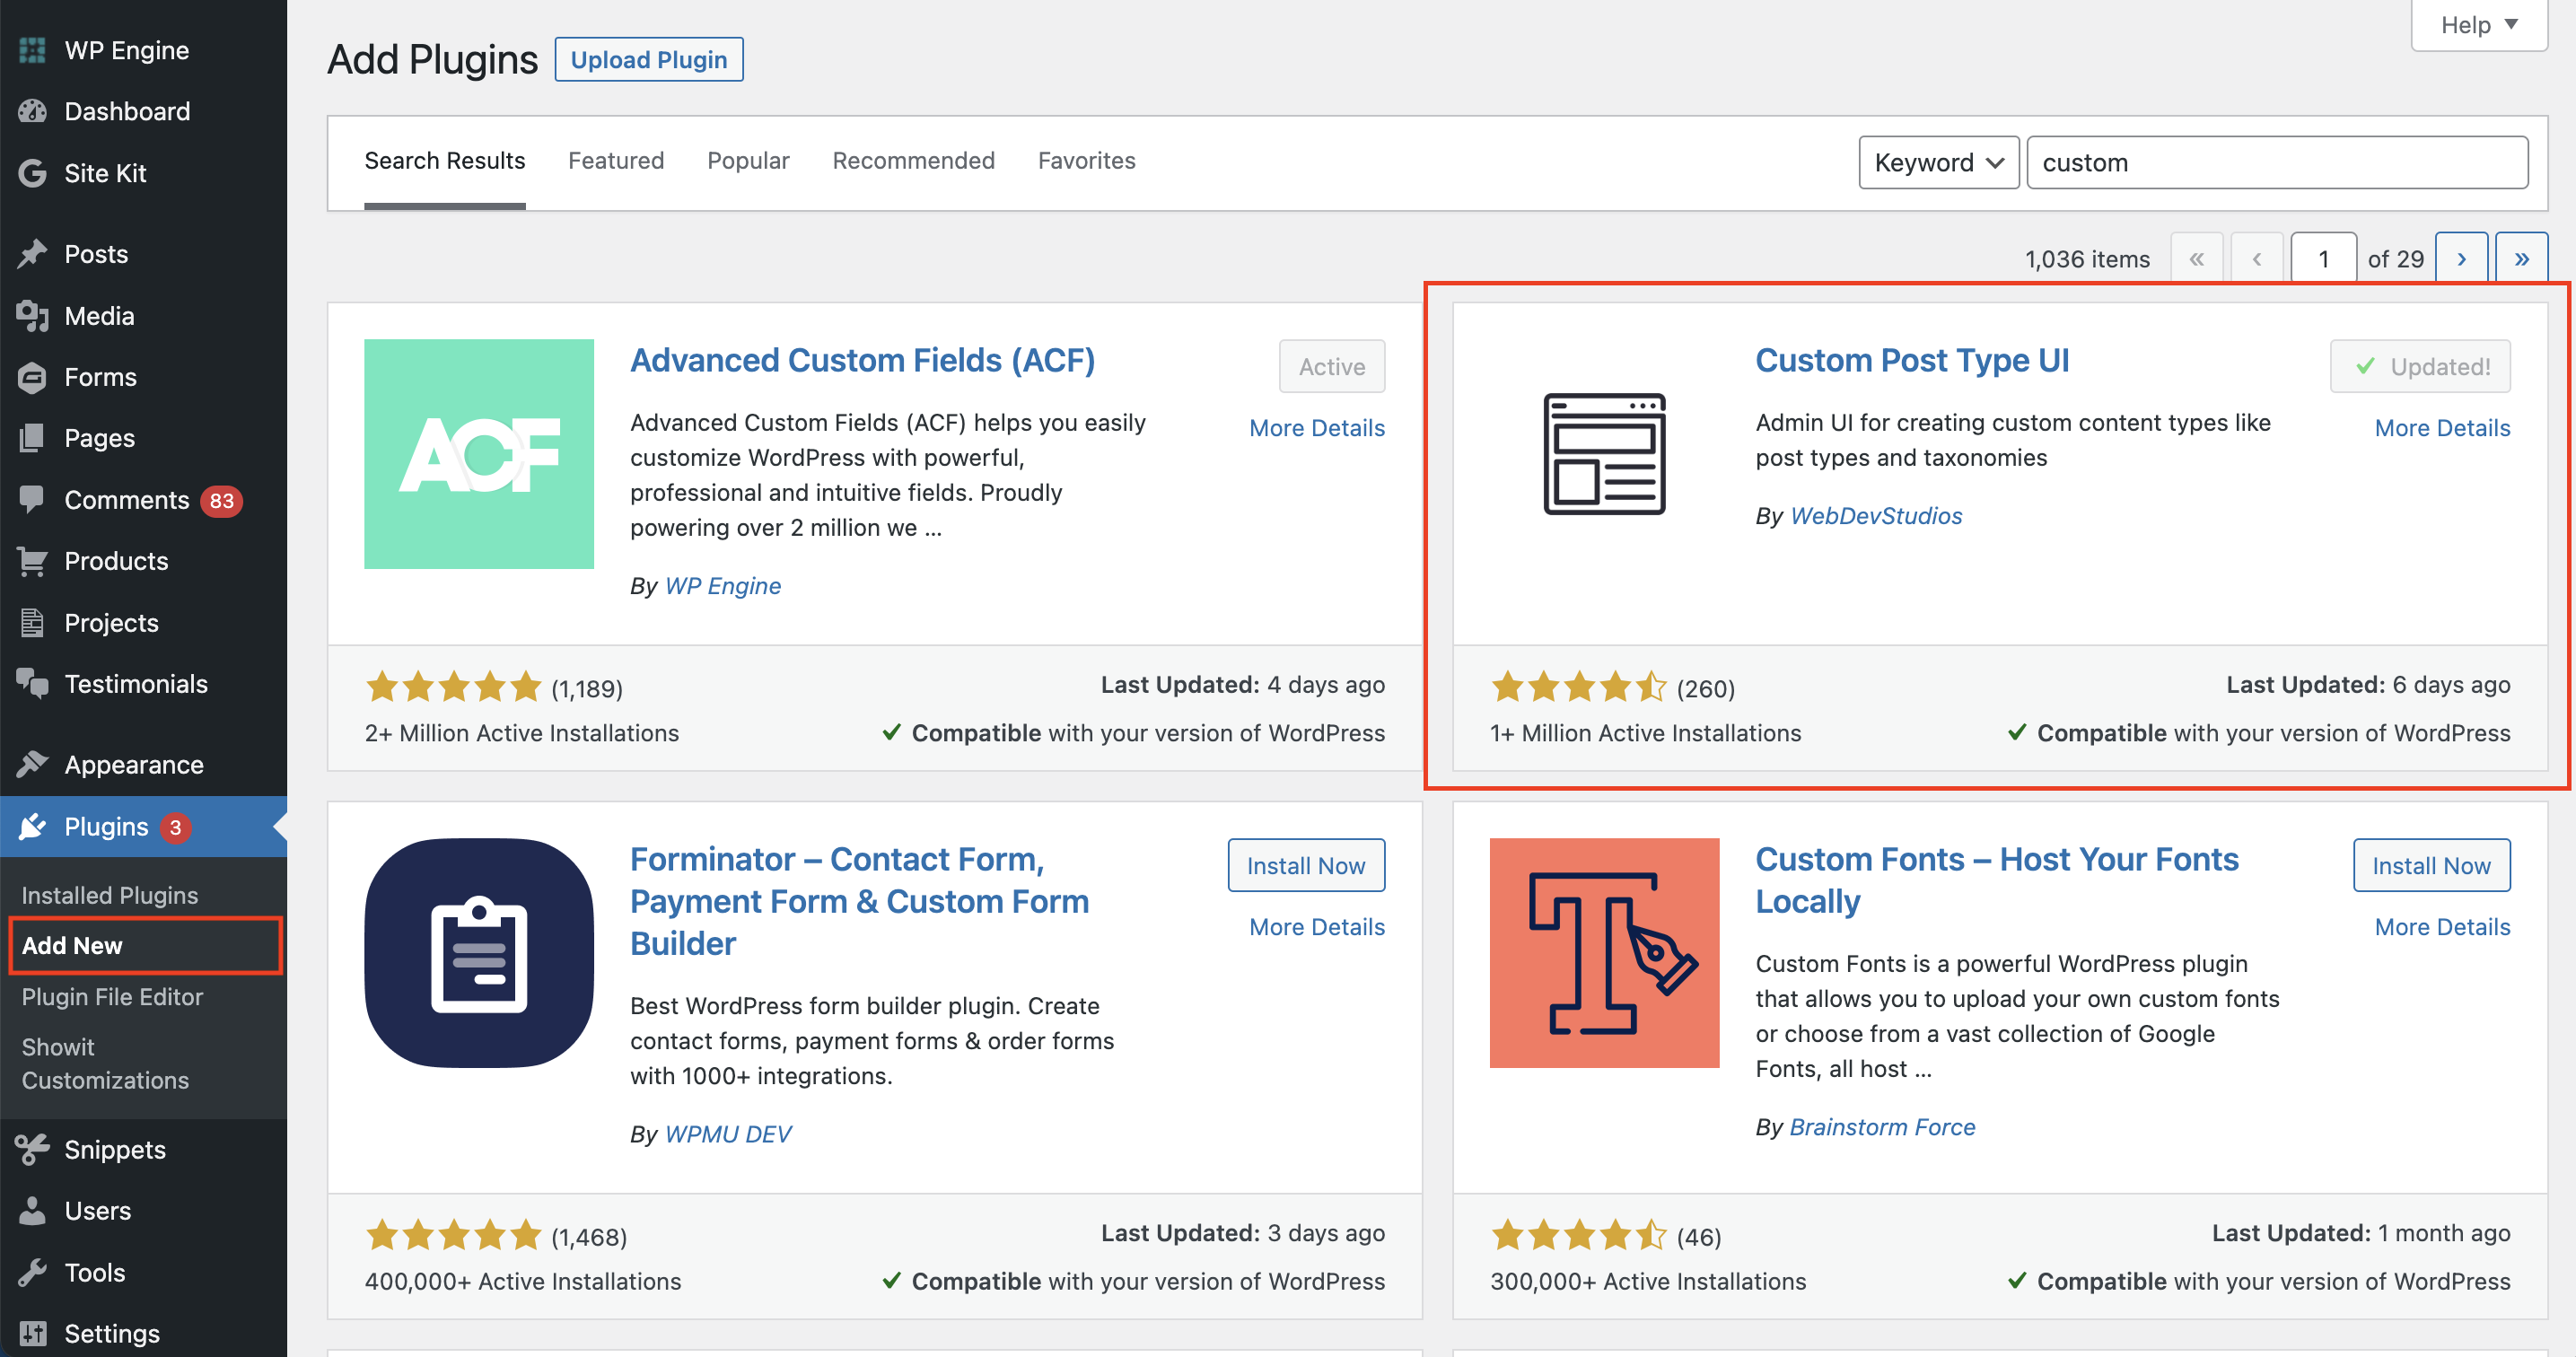
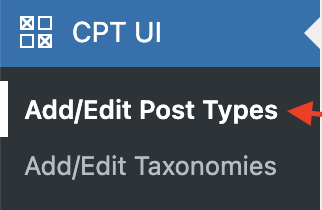
Once installed, click on Add / Edit Post Types.
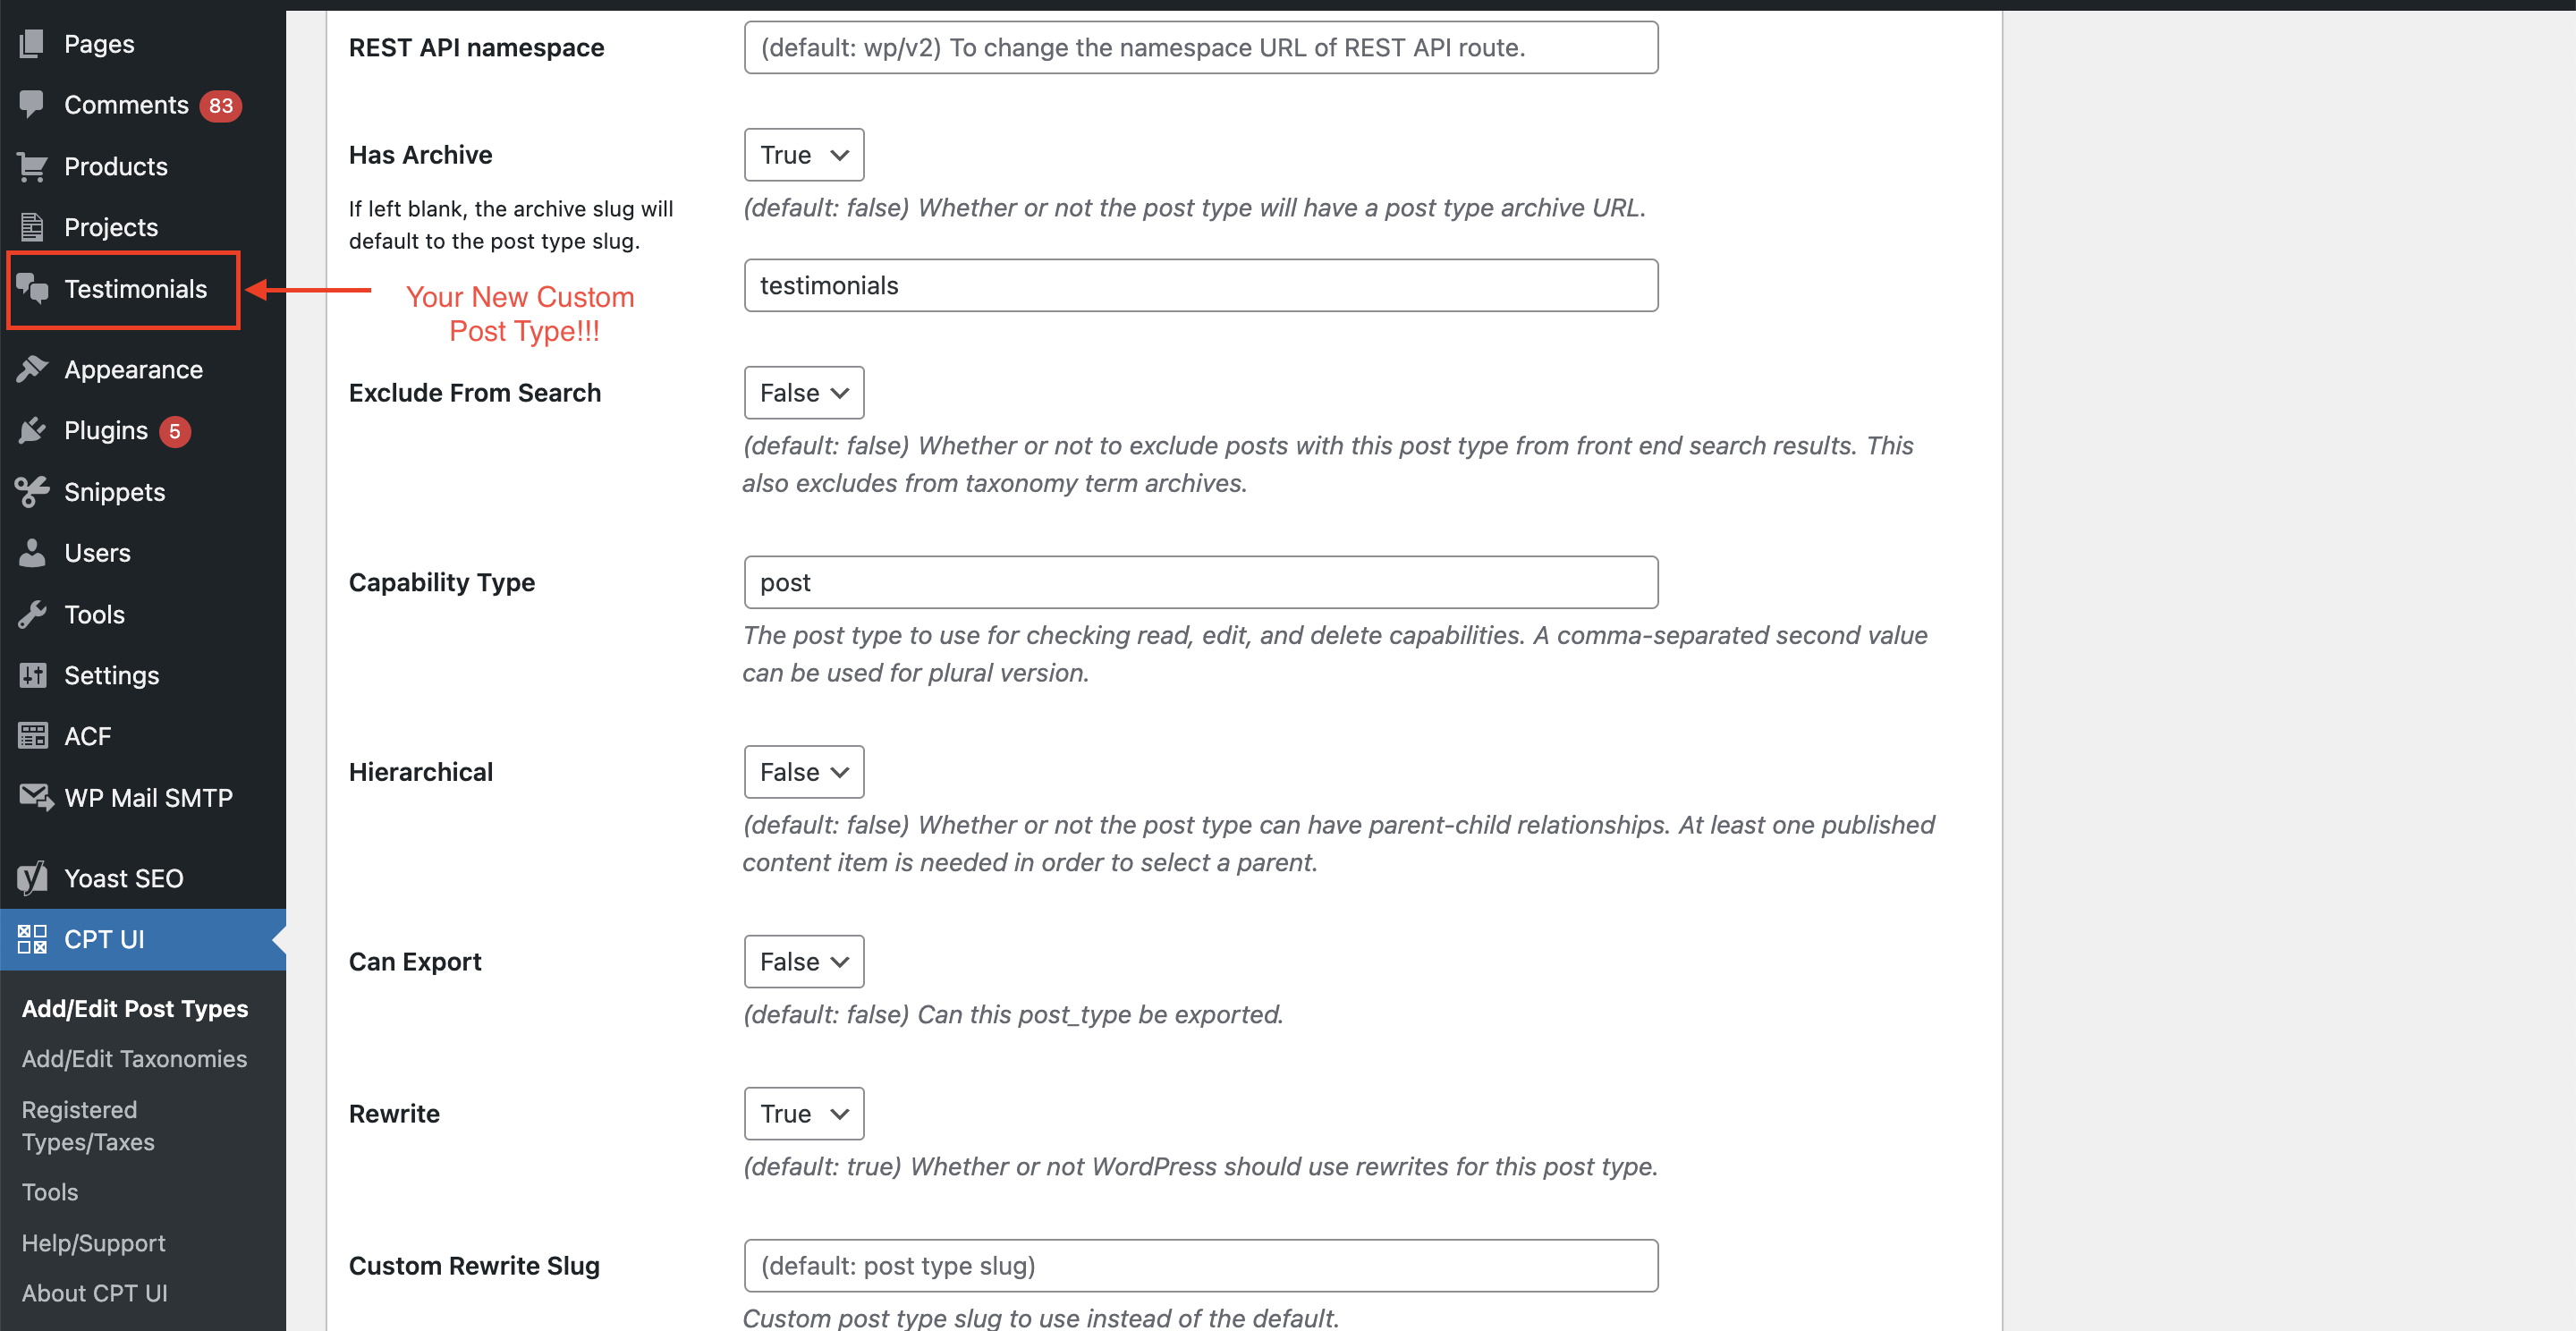
Don’t be intimidated by the editing screen you see next. You are going to see a lot of options and settings, but thankfully, many of these fields are already set up for you. Fill out the settings similar to how I have in the screenshots below, but with your own content.
Just be super mindful with spelling and wording as you fill in these fields as this can impact whether your posts will load properly once connected with WordPress. The key fields you will want to pay attention to are these:
- Post Type Slug
- Plural Label
- Singular Label
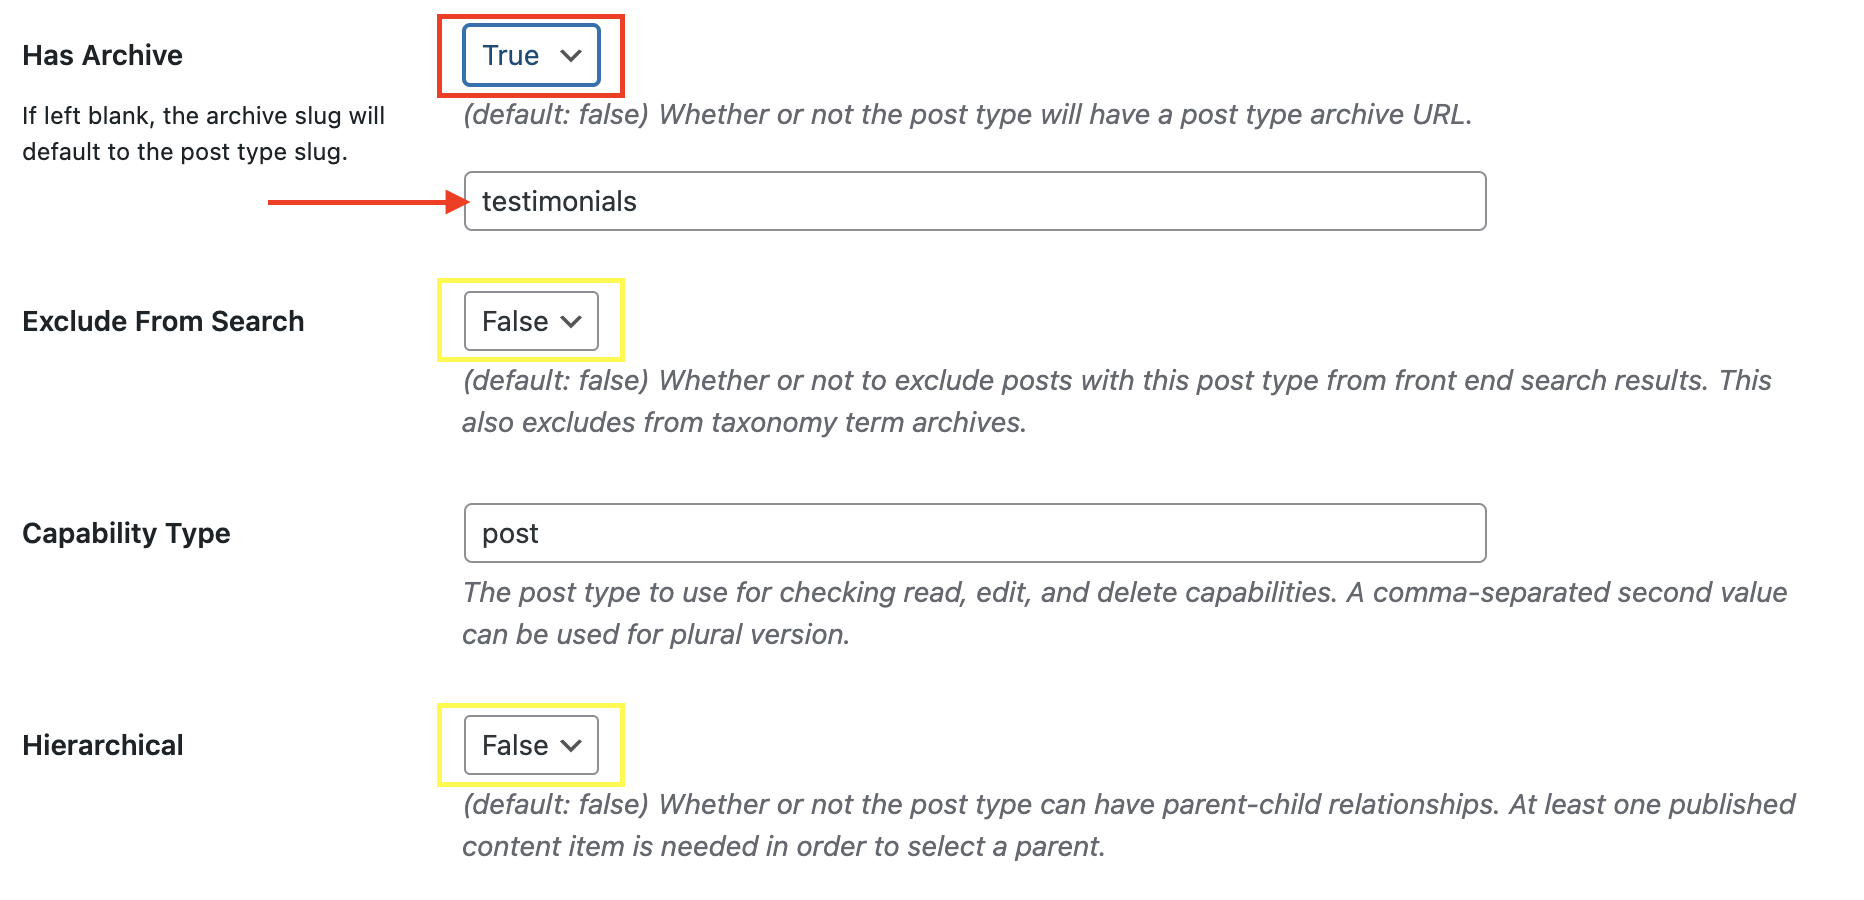
- Has Archive
- Menu Icon
- Categories & Tags (WP Core)

- If you don’t want your custom post types to be searchable by others on your site, you can set the Exclude from Search setting to True.
- If you don’t want your custom post type to be able to have parent-child hierarchy, set the Hierarchal setting to False.
- Just make sure the Has Archive setting is set to True if you want to be able to have a page with all of your custom posts listed there. Add a slug in the Archive Url field, like: testimonials
For your Menu Icon, this is the cute little icon next to your Custom Post label in the main menu on the left side in WordPress. You can choose from one of the pre-made Dashicon options that best fits your content or upload a custom image.
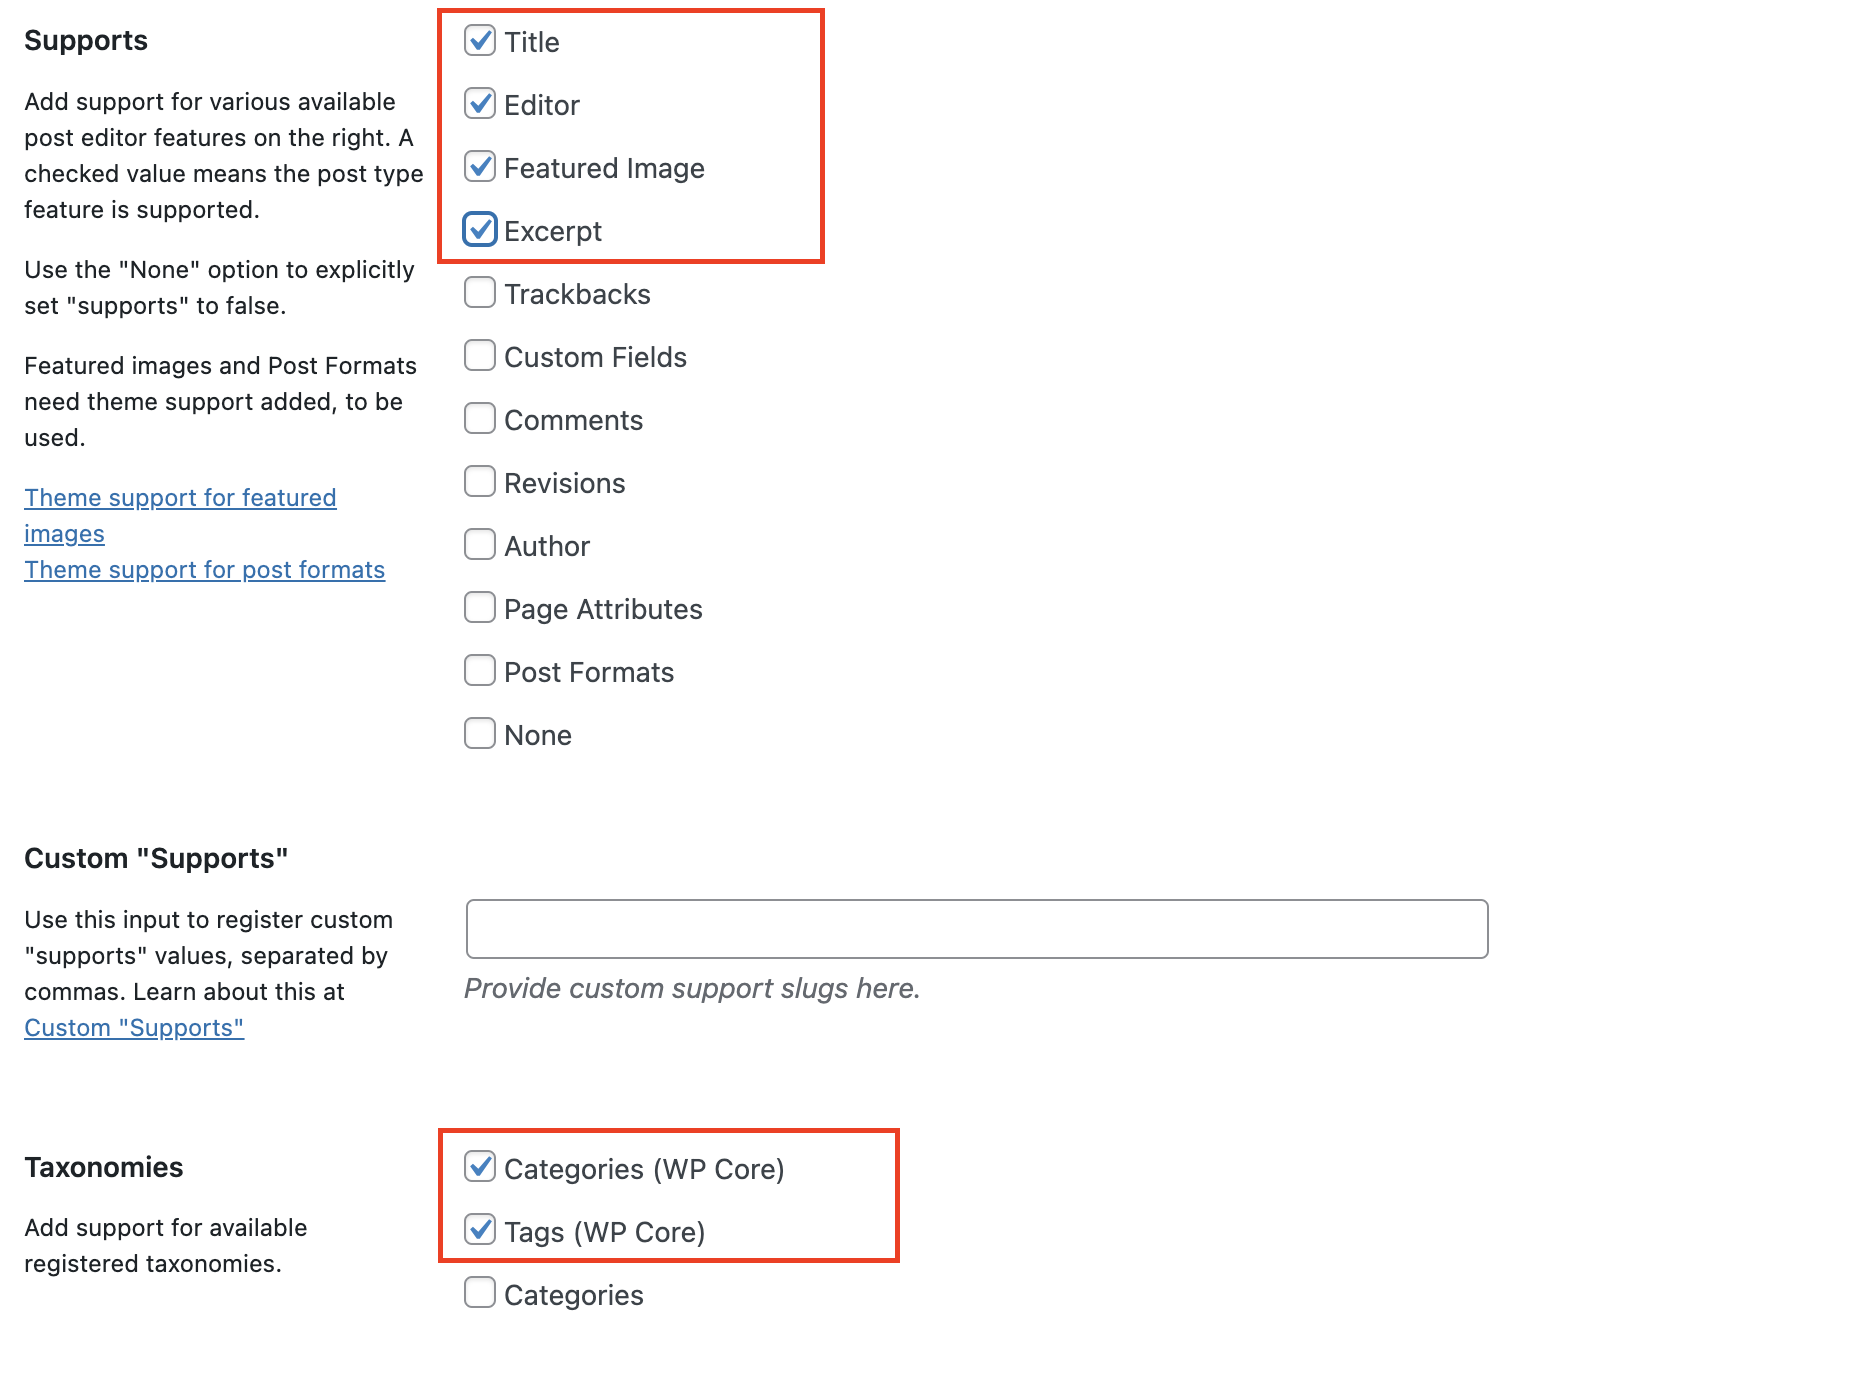
Finally, to enable editing supports on the right menu in WordPress you can check the following settings. Also, you can add support for Categories & Tags (Under Taxonomies) that can be pulled into Showit as well! (This will allow you to utilize the WordPress placeholders in Showit for these elements too.)
Now that you’ve got all your settings, click the blue button: Save Post Type and your Custom Post Type should now appear in the left menu!

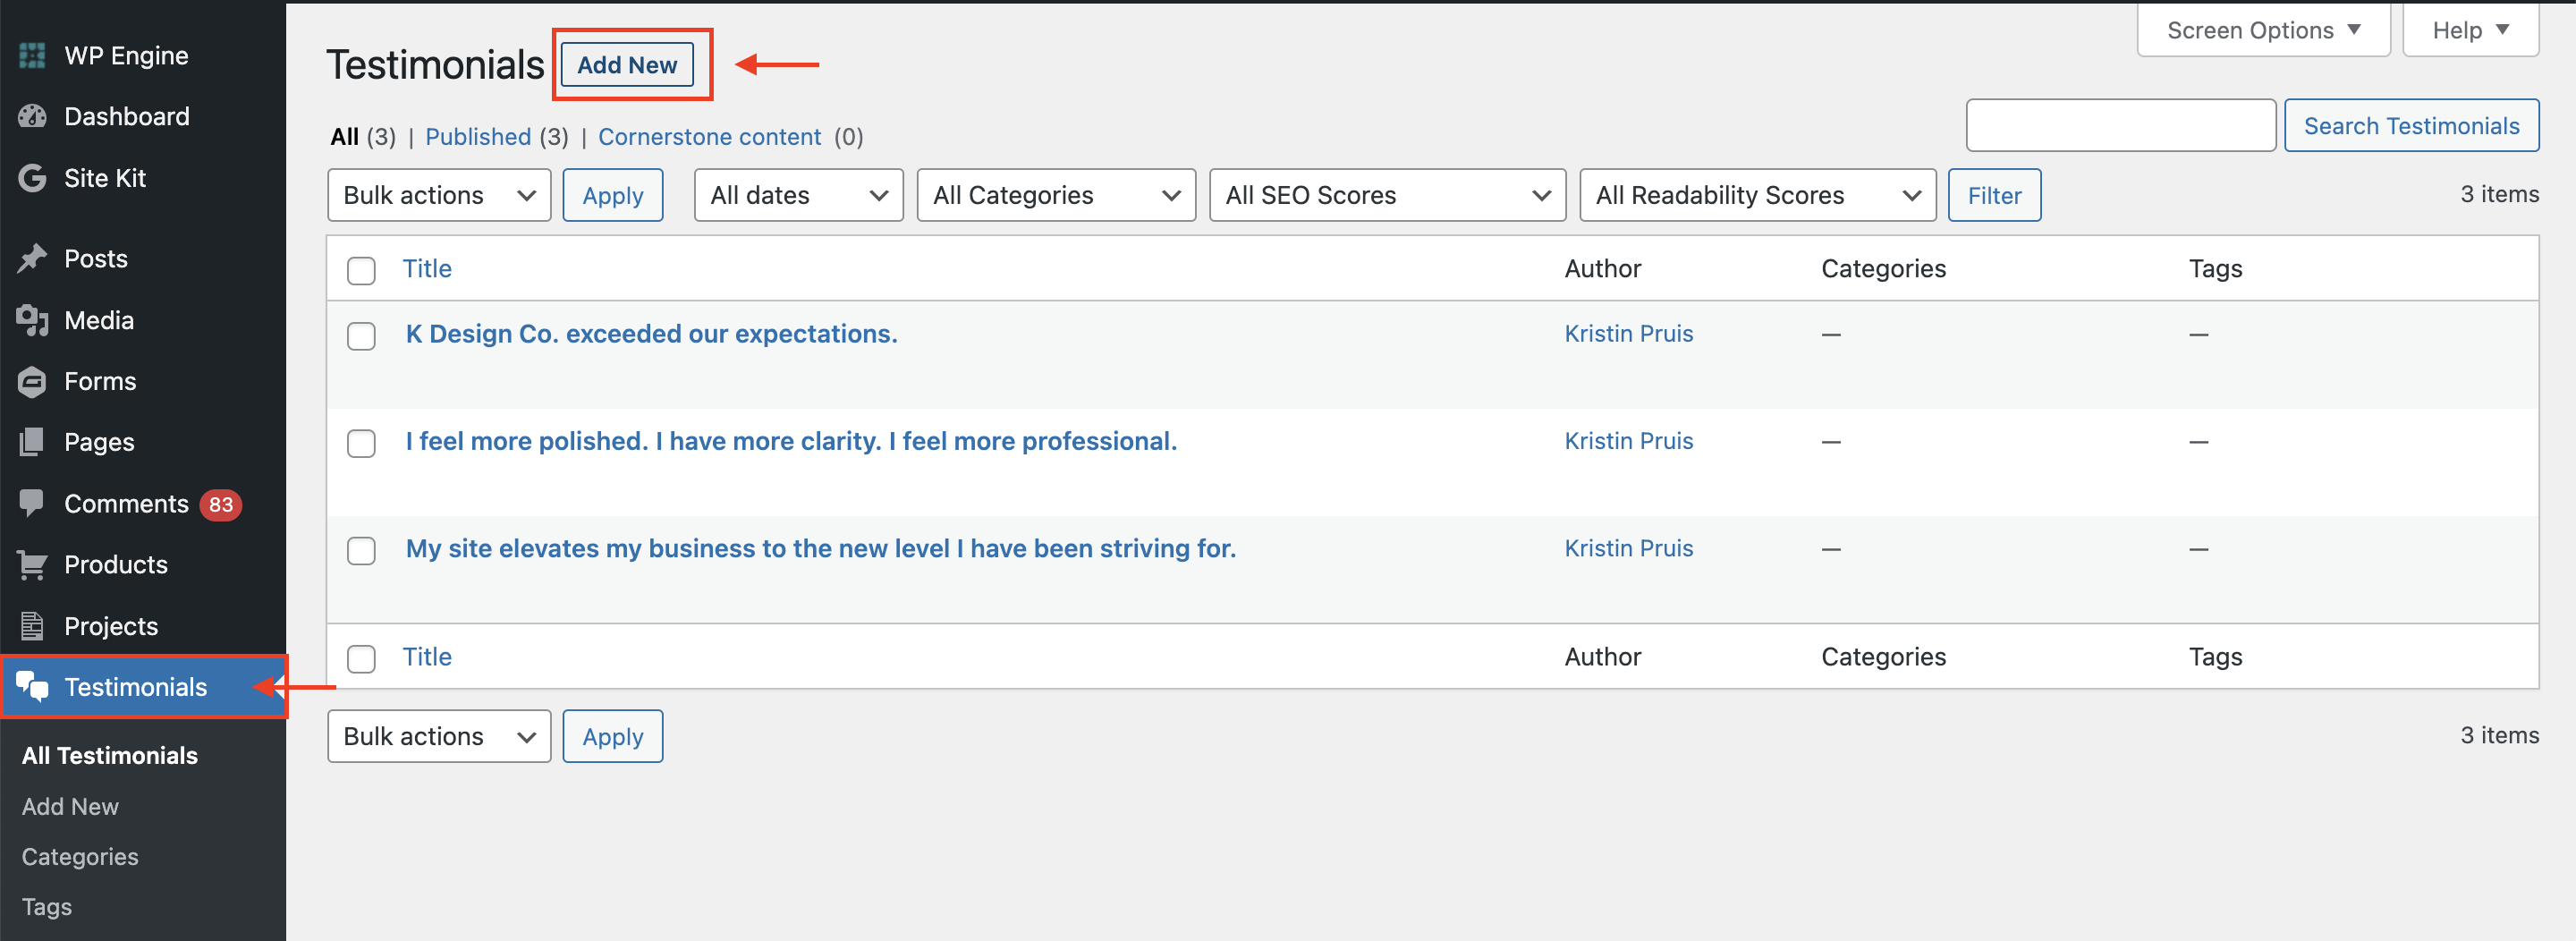
Step 2: Add Your Post Content
Once you’ve got your custom post type settings filled out, you can start creating new posts right away. Just click Add New under the menu for your new custom post type.
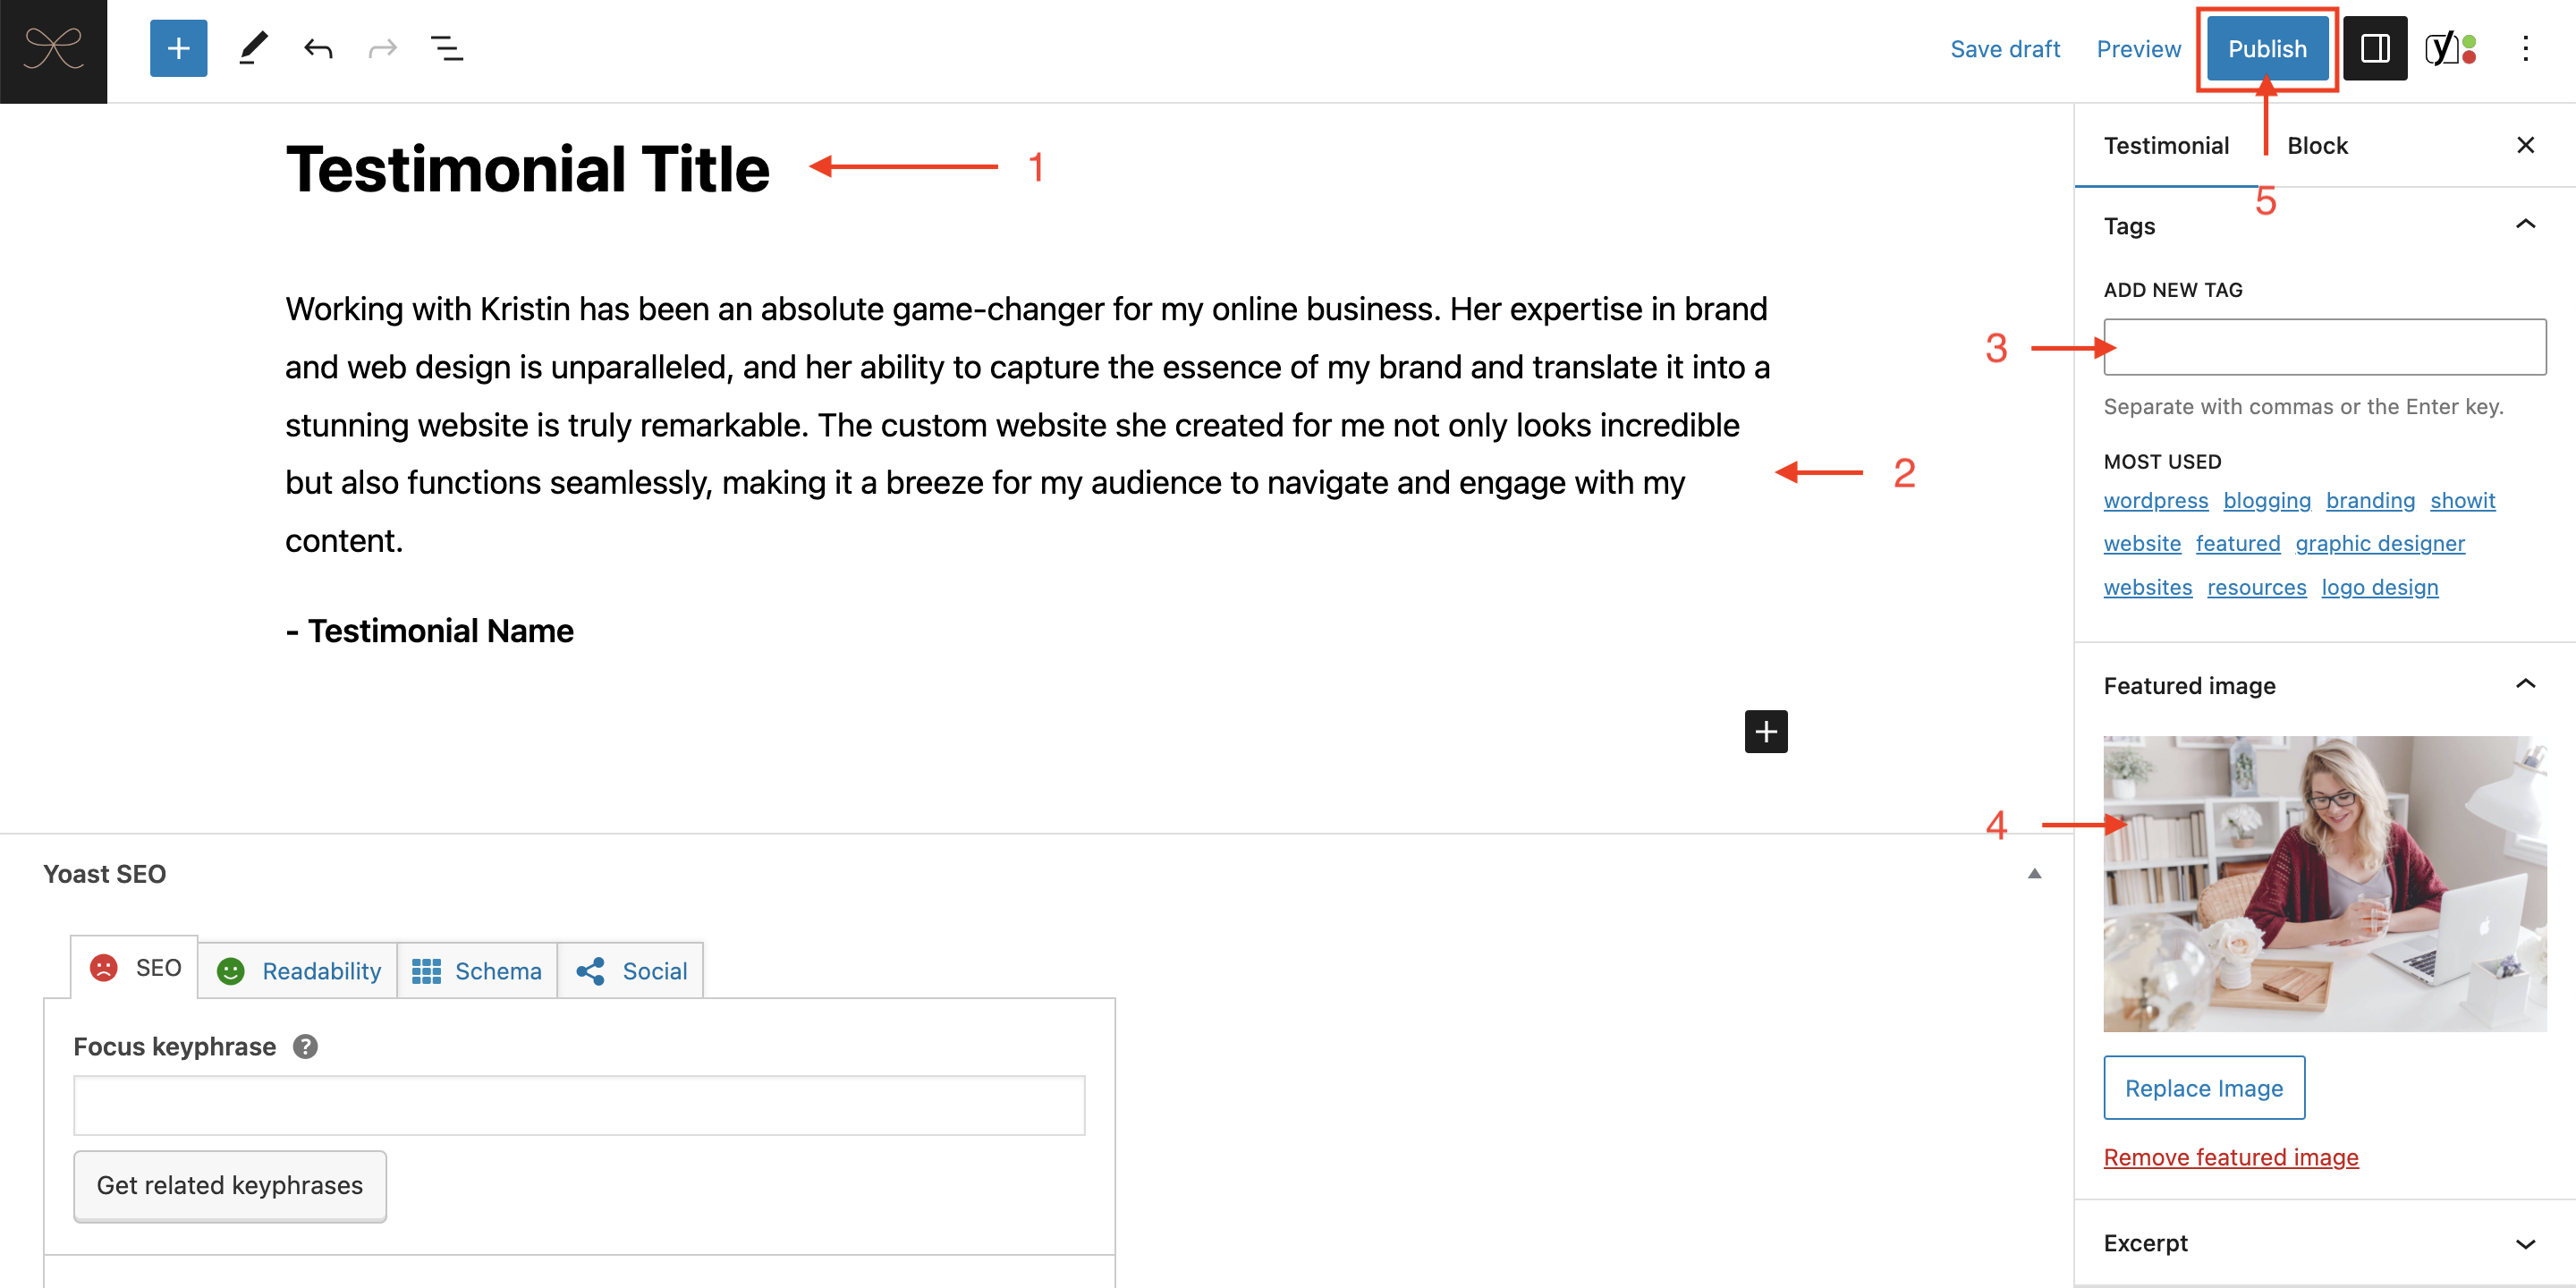
The main elements you can include in your custom post type are identical to what you can have in a blog post:
- A post title
- Post description / main content
- Featured Image
- Category / tags
So, publishing a new custom post is nearly identical to creating a blog post or page in WordPress too! Check out the example below for the custom post type I created for a testimonial:
Once you’ve got your custom posts created in WordPress, jump over to Showit to finish setting up how you want them to display on your site.
Step 3: Create an Archive Template for Your Custom Post Type in Showit
A post archive template is a page dedicated to showing all of the posts for a single custom post type, for example a page that lists all of your testimonials.
Pro tip: If you don’t want to create a custom page that lists all of your custom posts of a certain type, then you can skip this step. By default, WordPress will use your blog feed or any other archive template you may have to format your custom post types.
- To create a post archive template, duplicate a blog page design in Showit that most closely resembles the design you want to create. For example, I recommend duplicating your blog feed or a category page design since those templates should already have a lot of the components and placeholders set up that you will need.
(Hint: Don’t be fooled by the label “Blog Template” in Showit. This doesn’t mean your page design will necessarily be used for your blog. Setting up your custom post type templates this way just means it will have the ability to integrate with WordPress.)
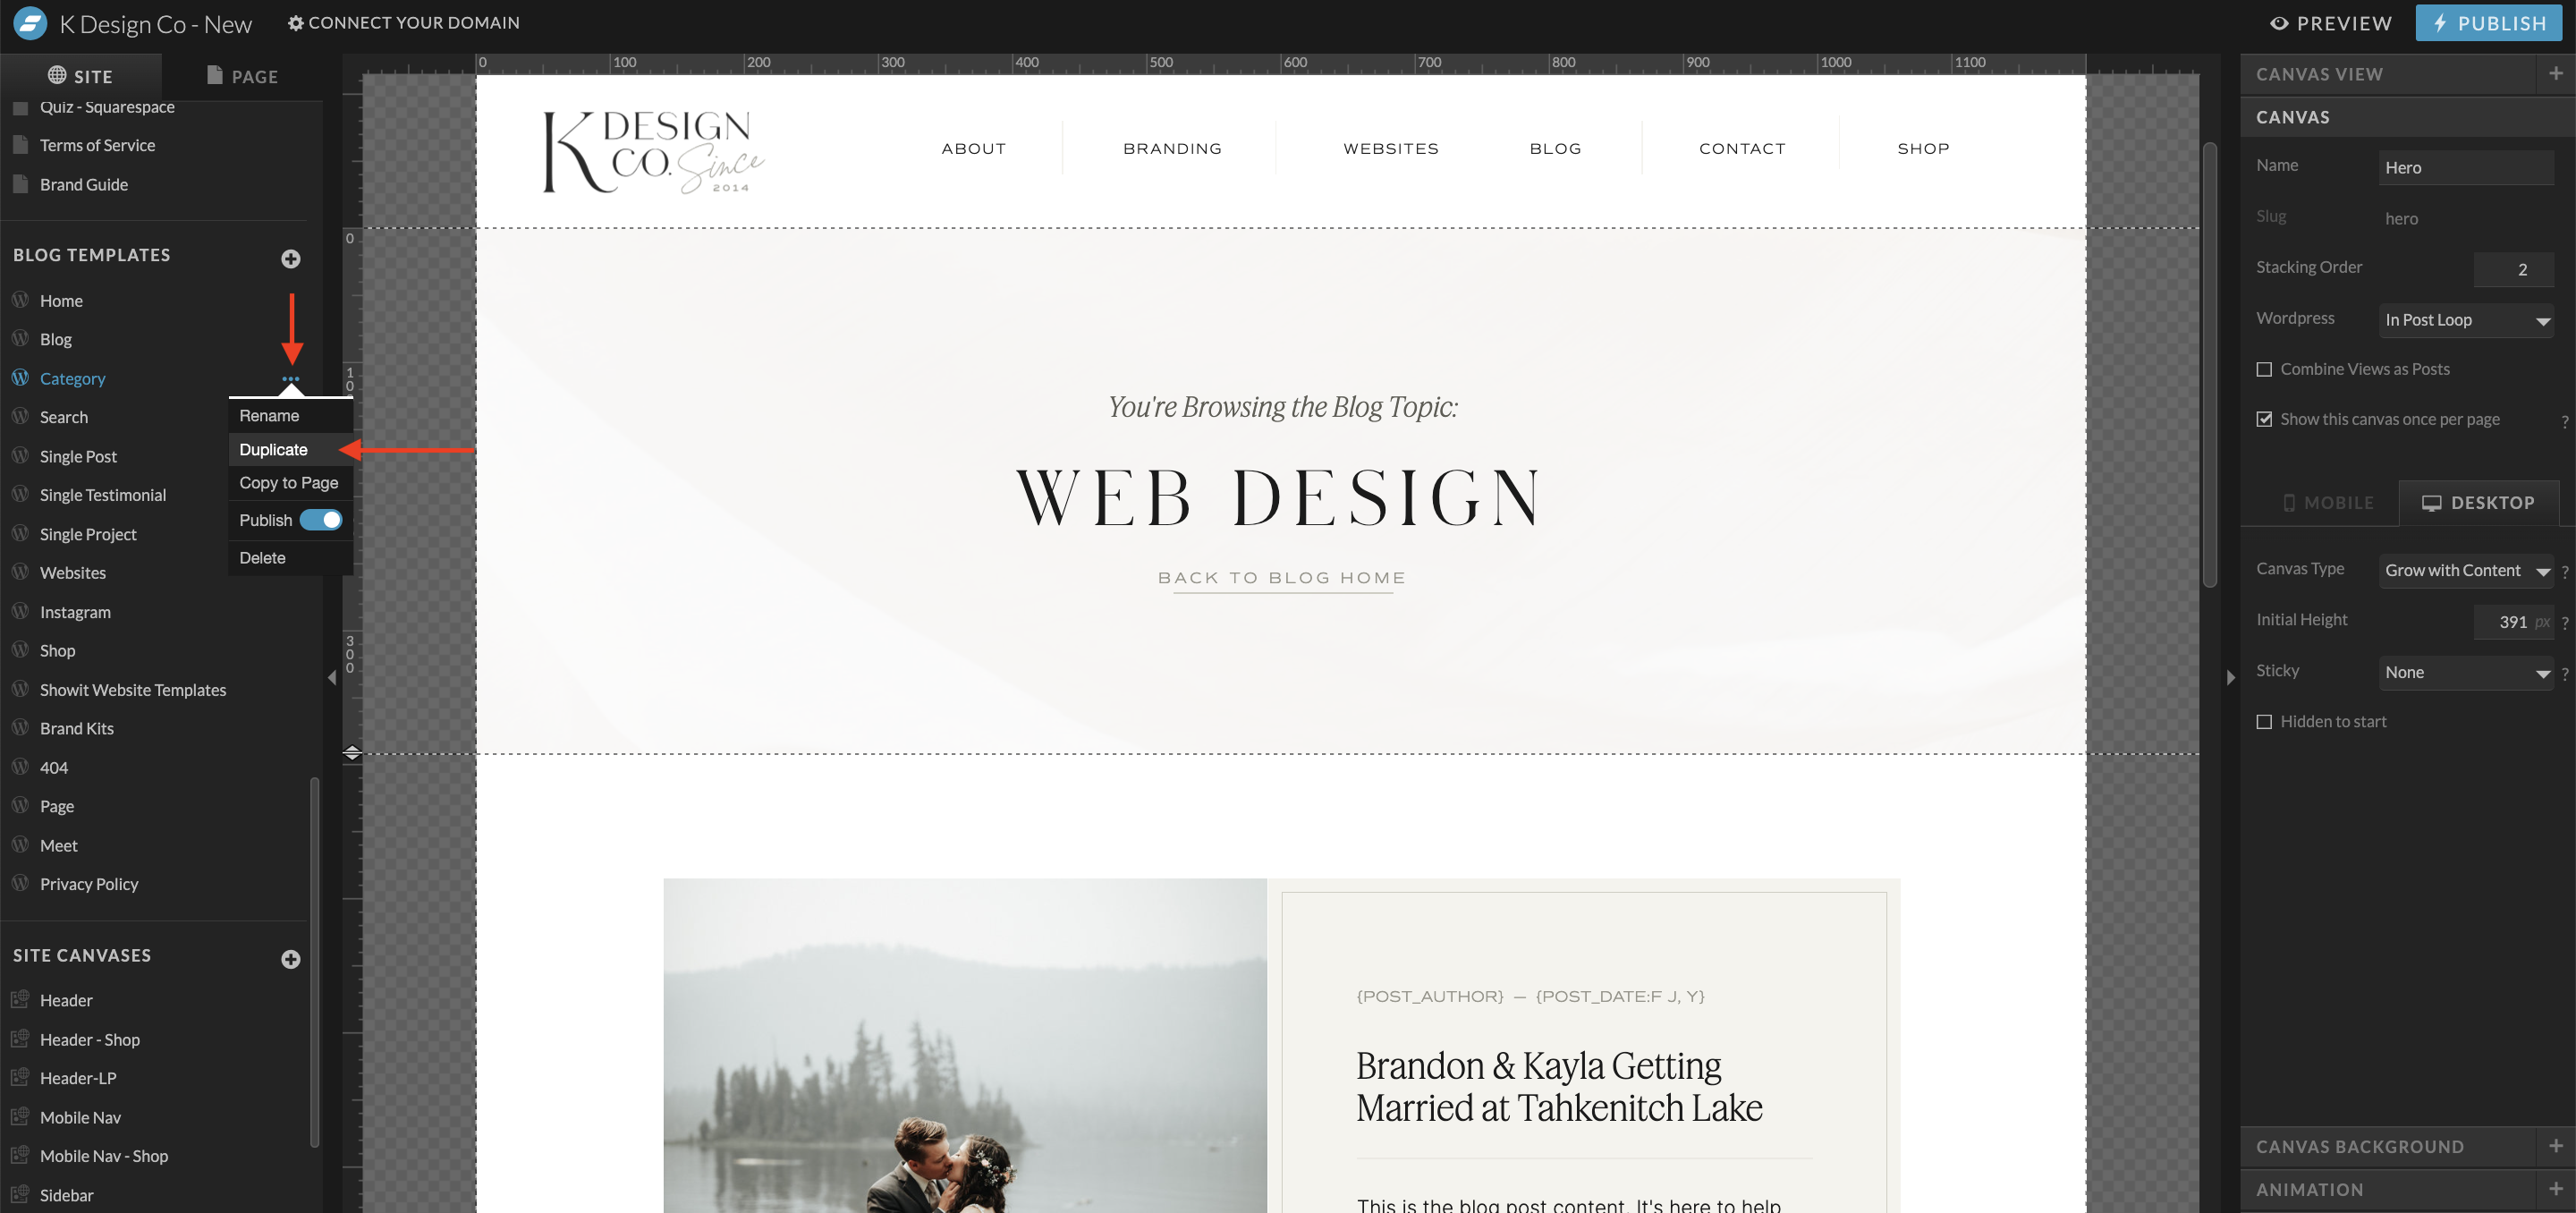
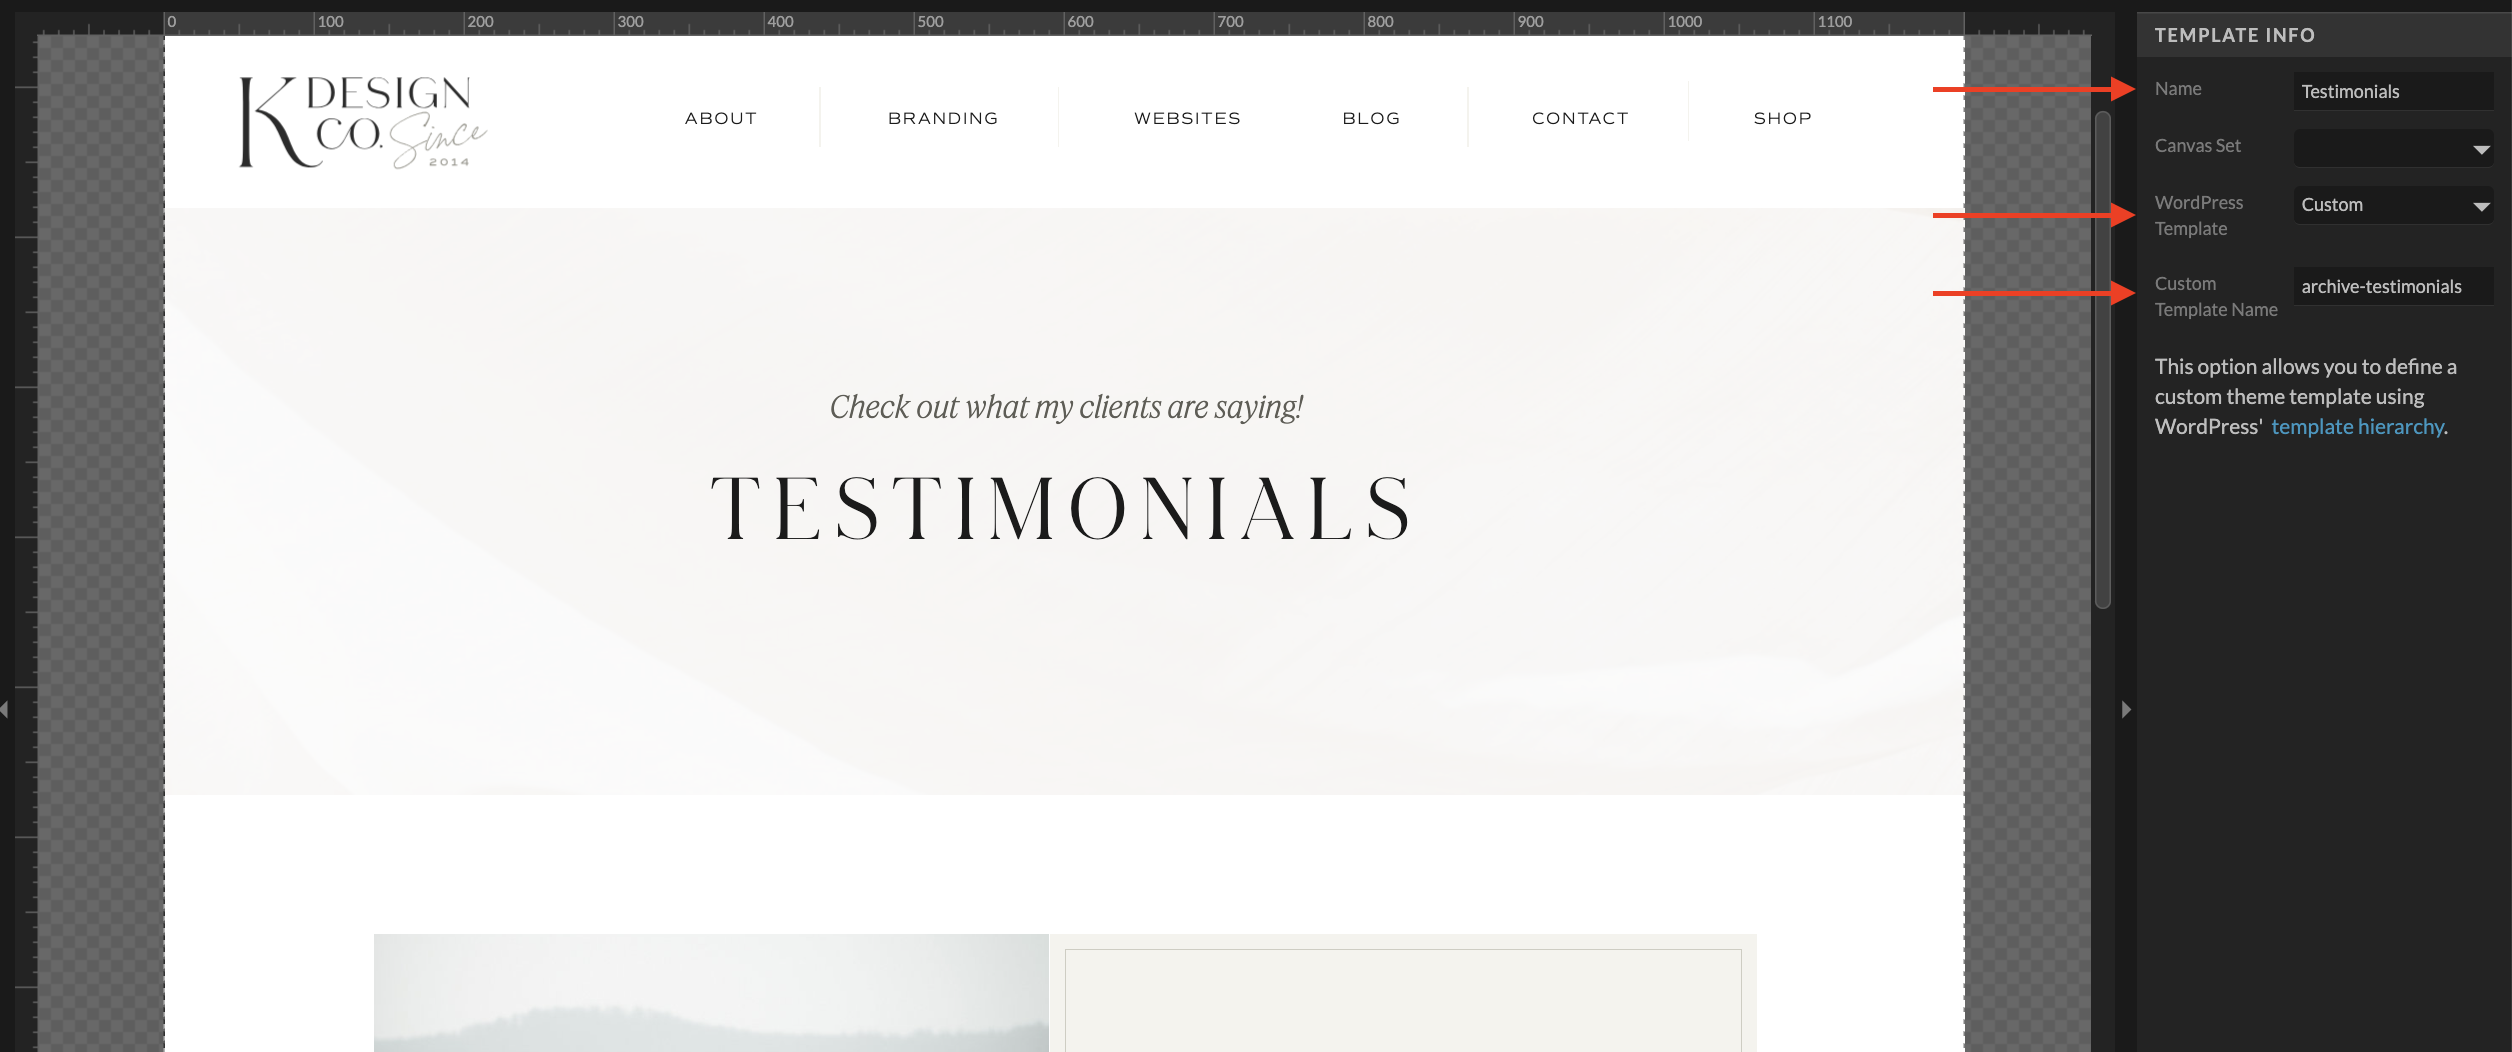
- Next rename the page to something that fits your content, ie. Testimonials. This should exactly match the Archive Url you specified on your Custom Post Type, otherwise it won’t automatically pull in your post.
- Under Template Info on the right menu, change the WordPress Template to Custom
- Under Custom Template Name, start with the prefix “archive-” and then follow it with the slug name of your custom post type, for example: archive-testimonials. (Keep it all lowercase and use hyphens instead of spaces, if you have multiple words.)
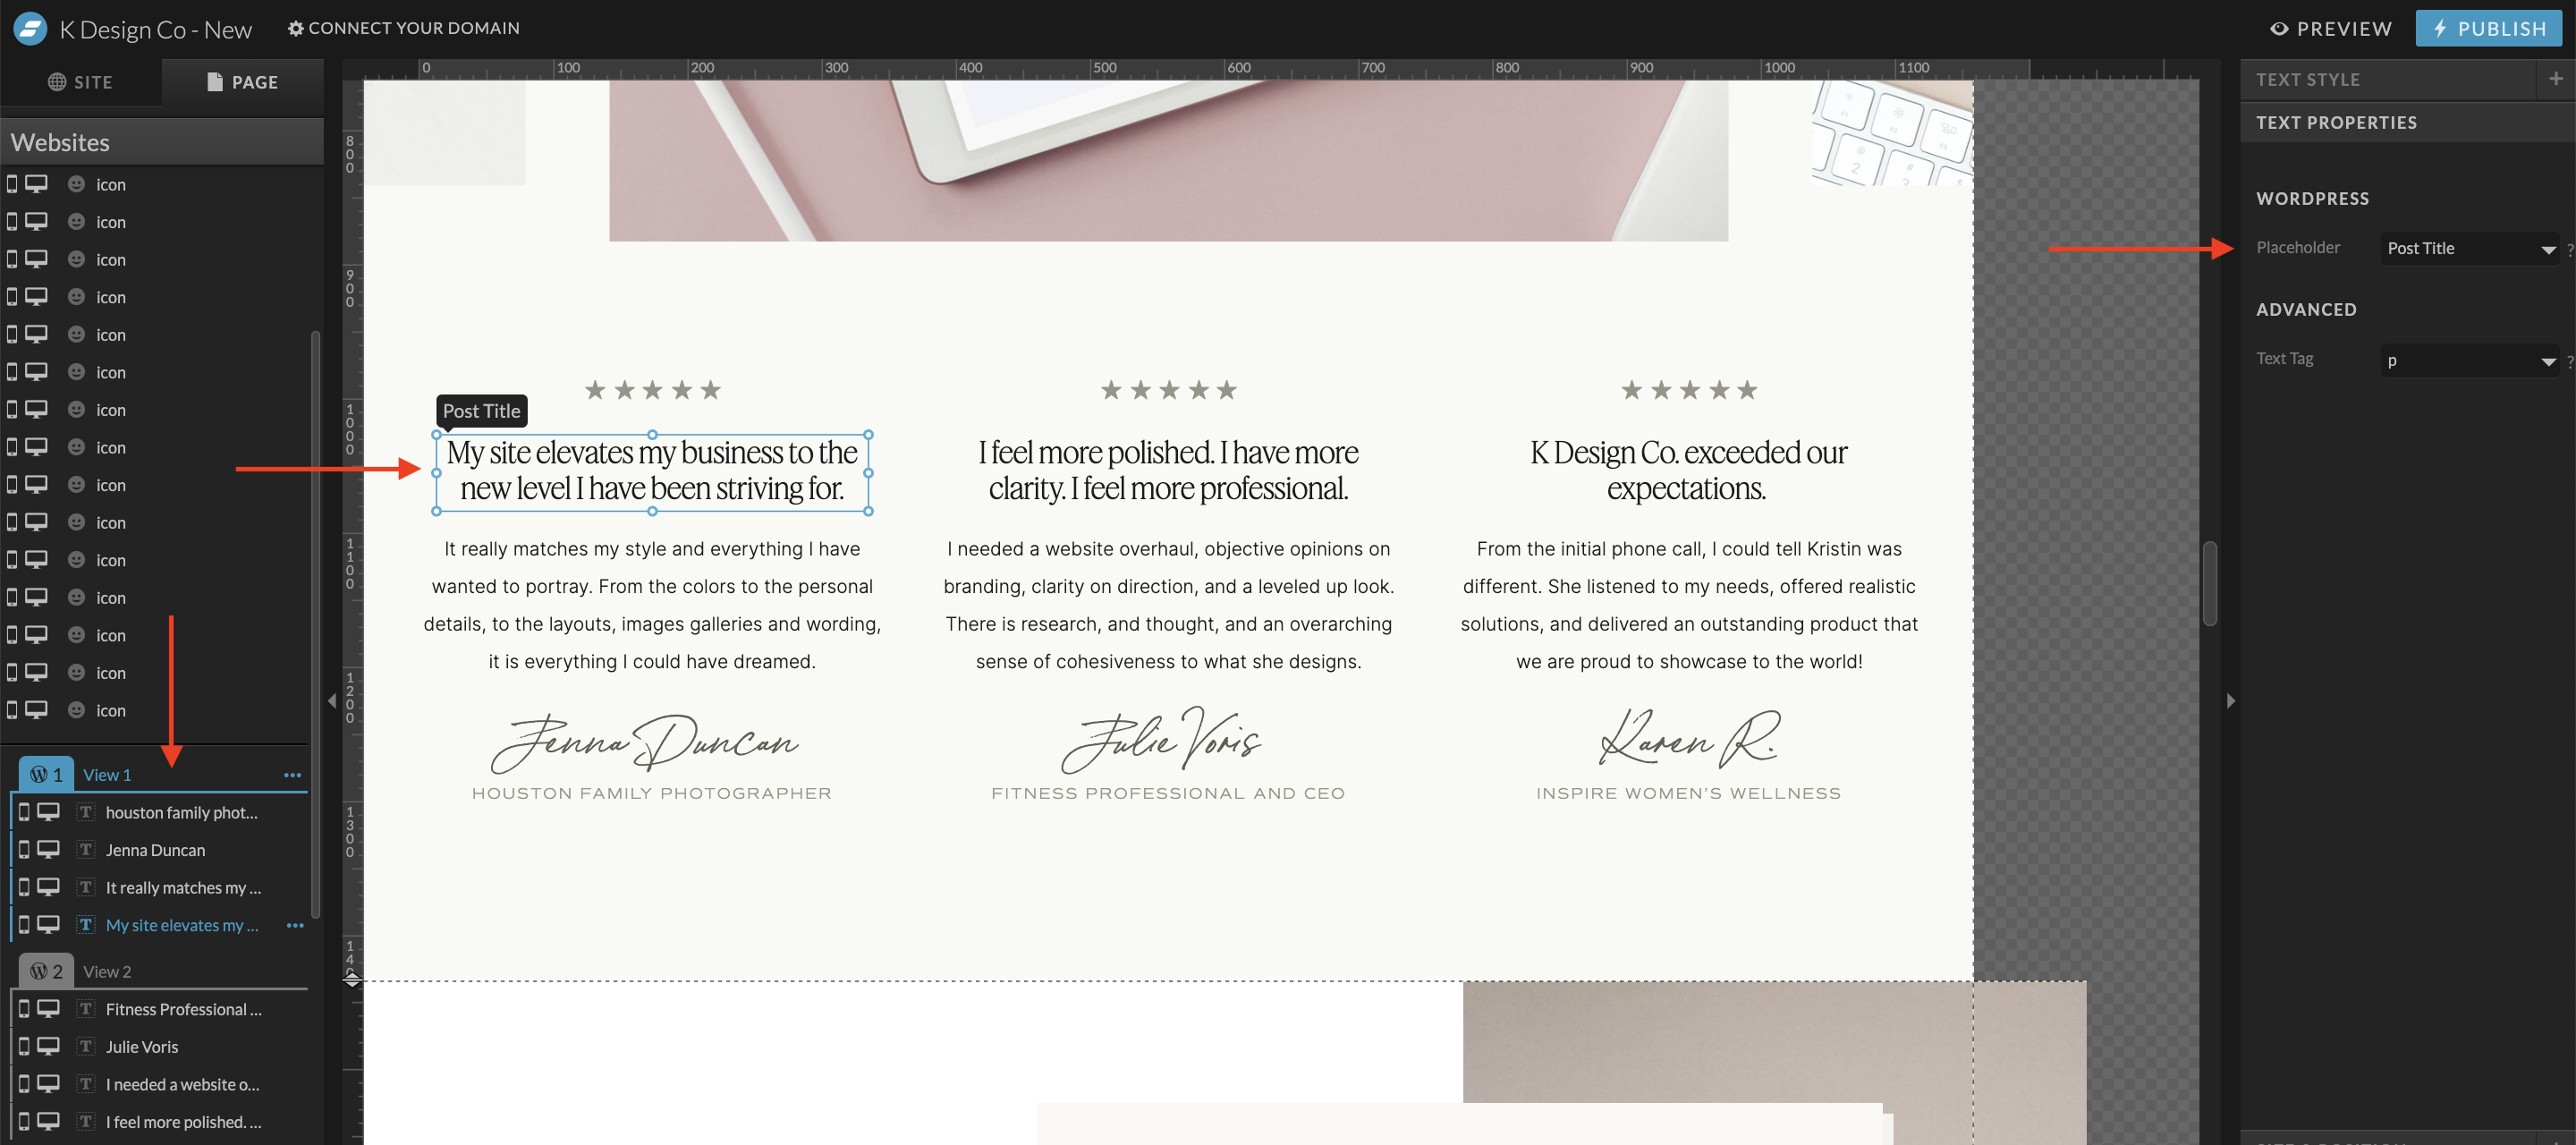
- Now, you can finish formatting the page based on how you would like your custom posts to display. You will need to use the same WordPress placeholders (Under Text Properties) required for standard blog pages such as:
- Post Title
- Post Content
- Post Excerpt
- Categories / Tags
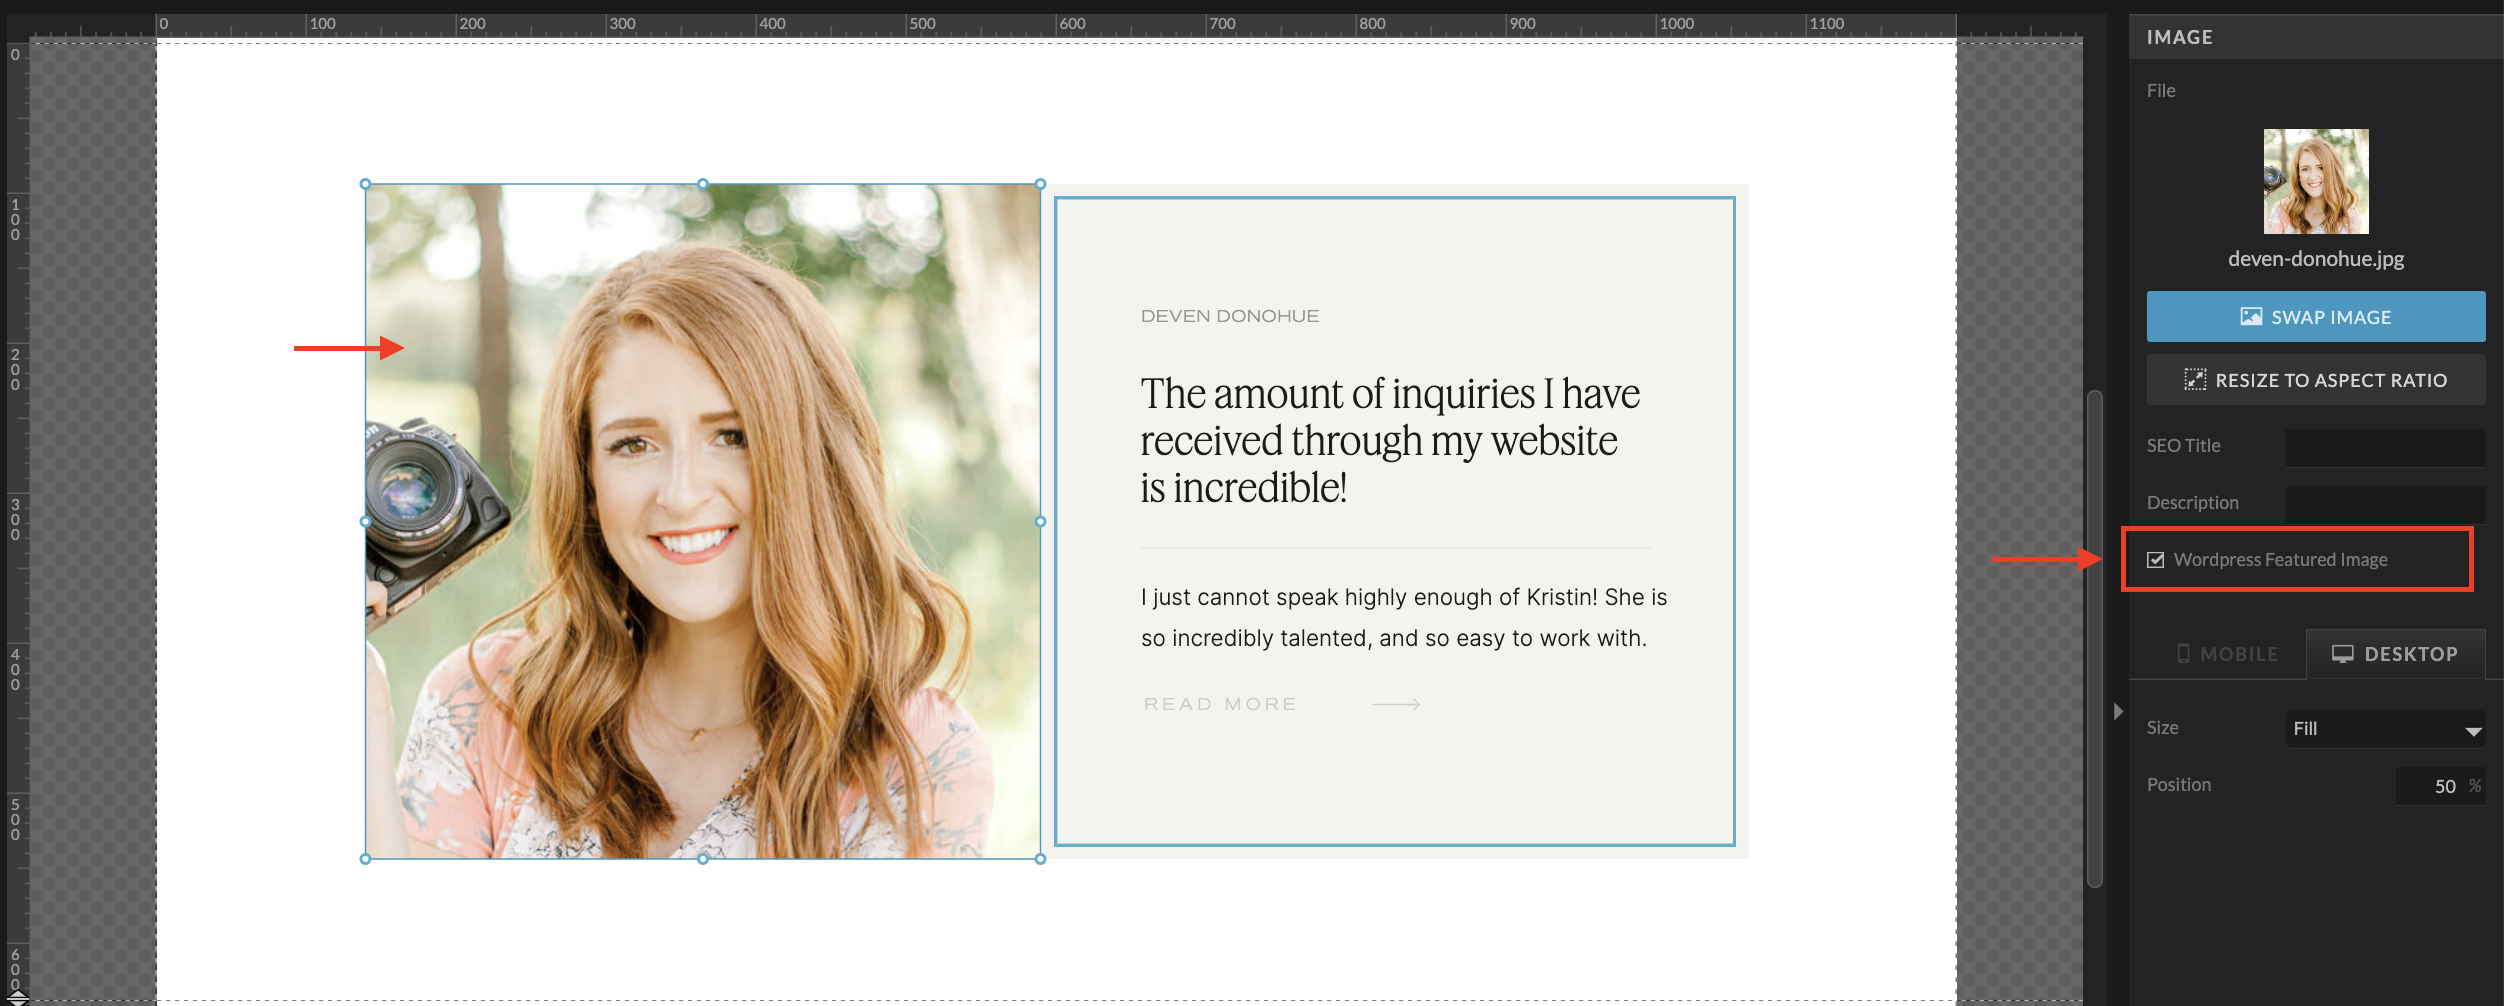
- Featured Image (Remember to check the box for your image to assign it as the WordPress Featured Image)
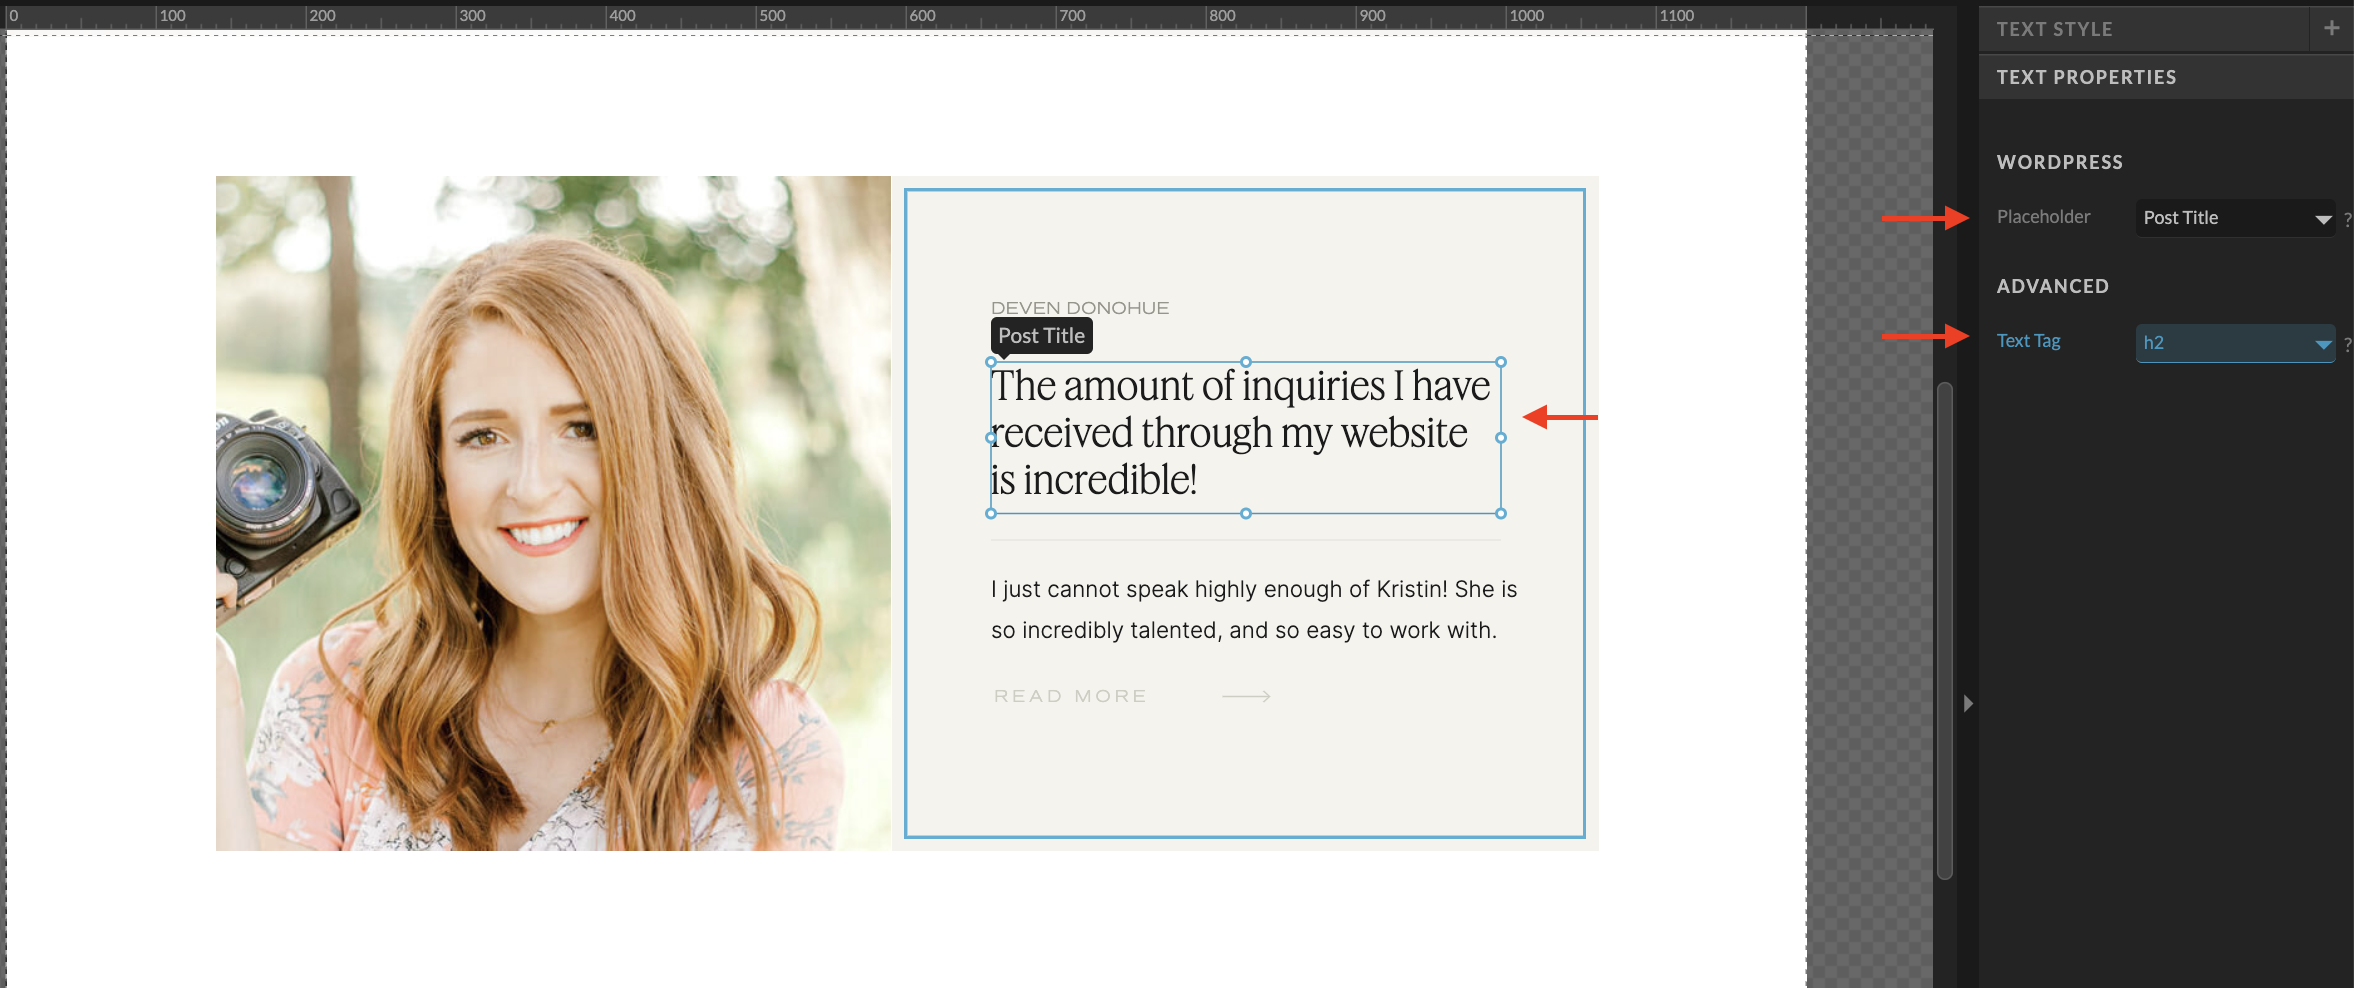
Pro tip: Make sure your Text Tag is also NOT an H1! (This should be reserved only for your main page title.)
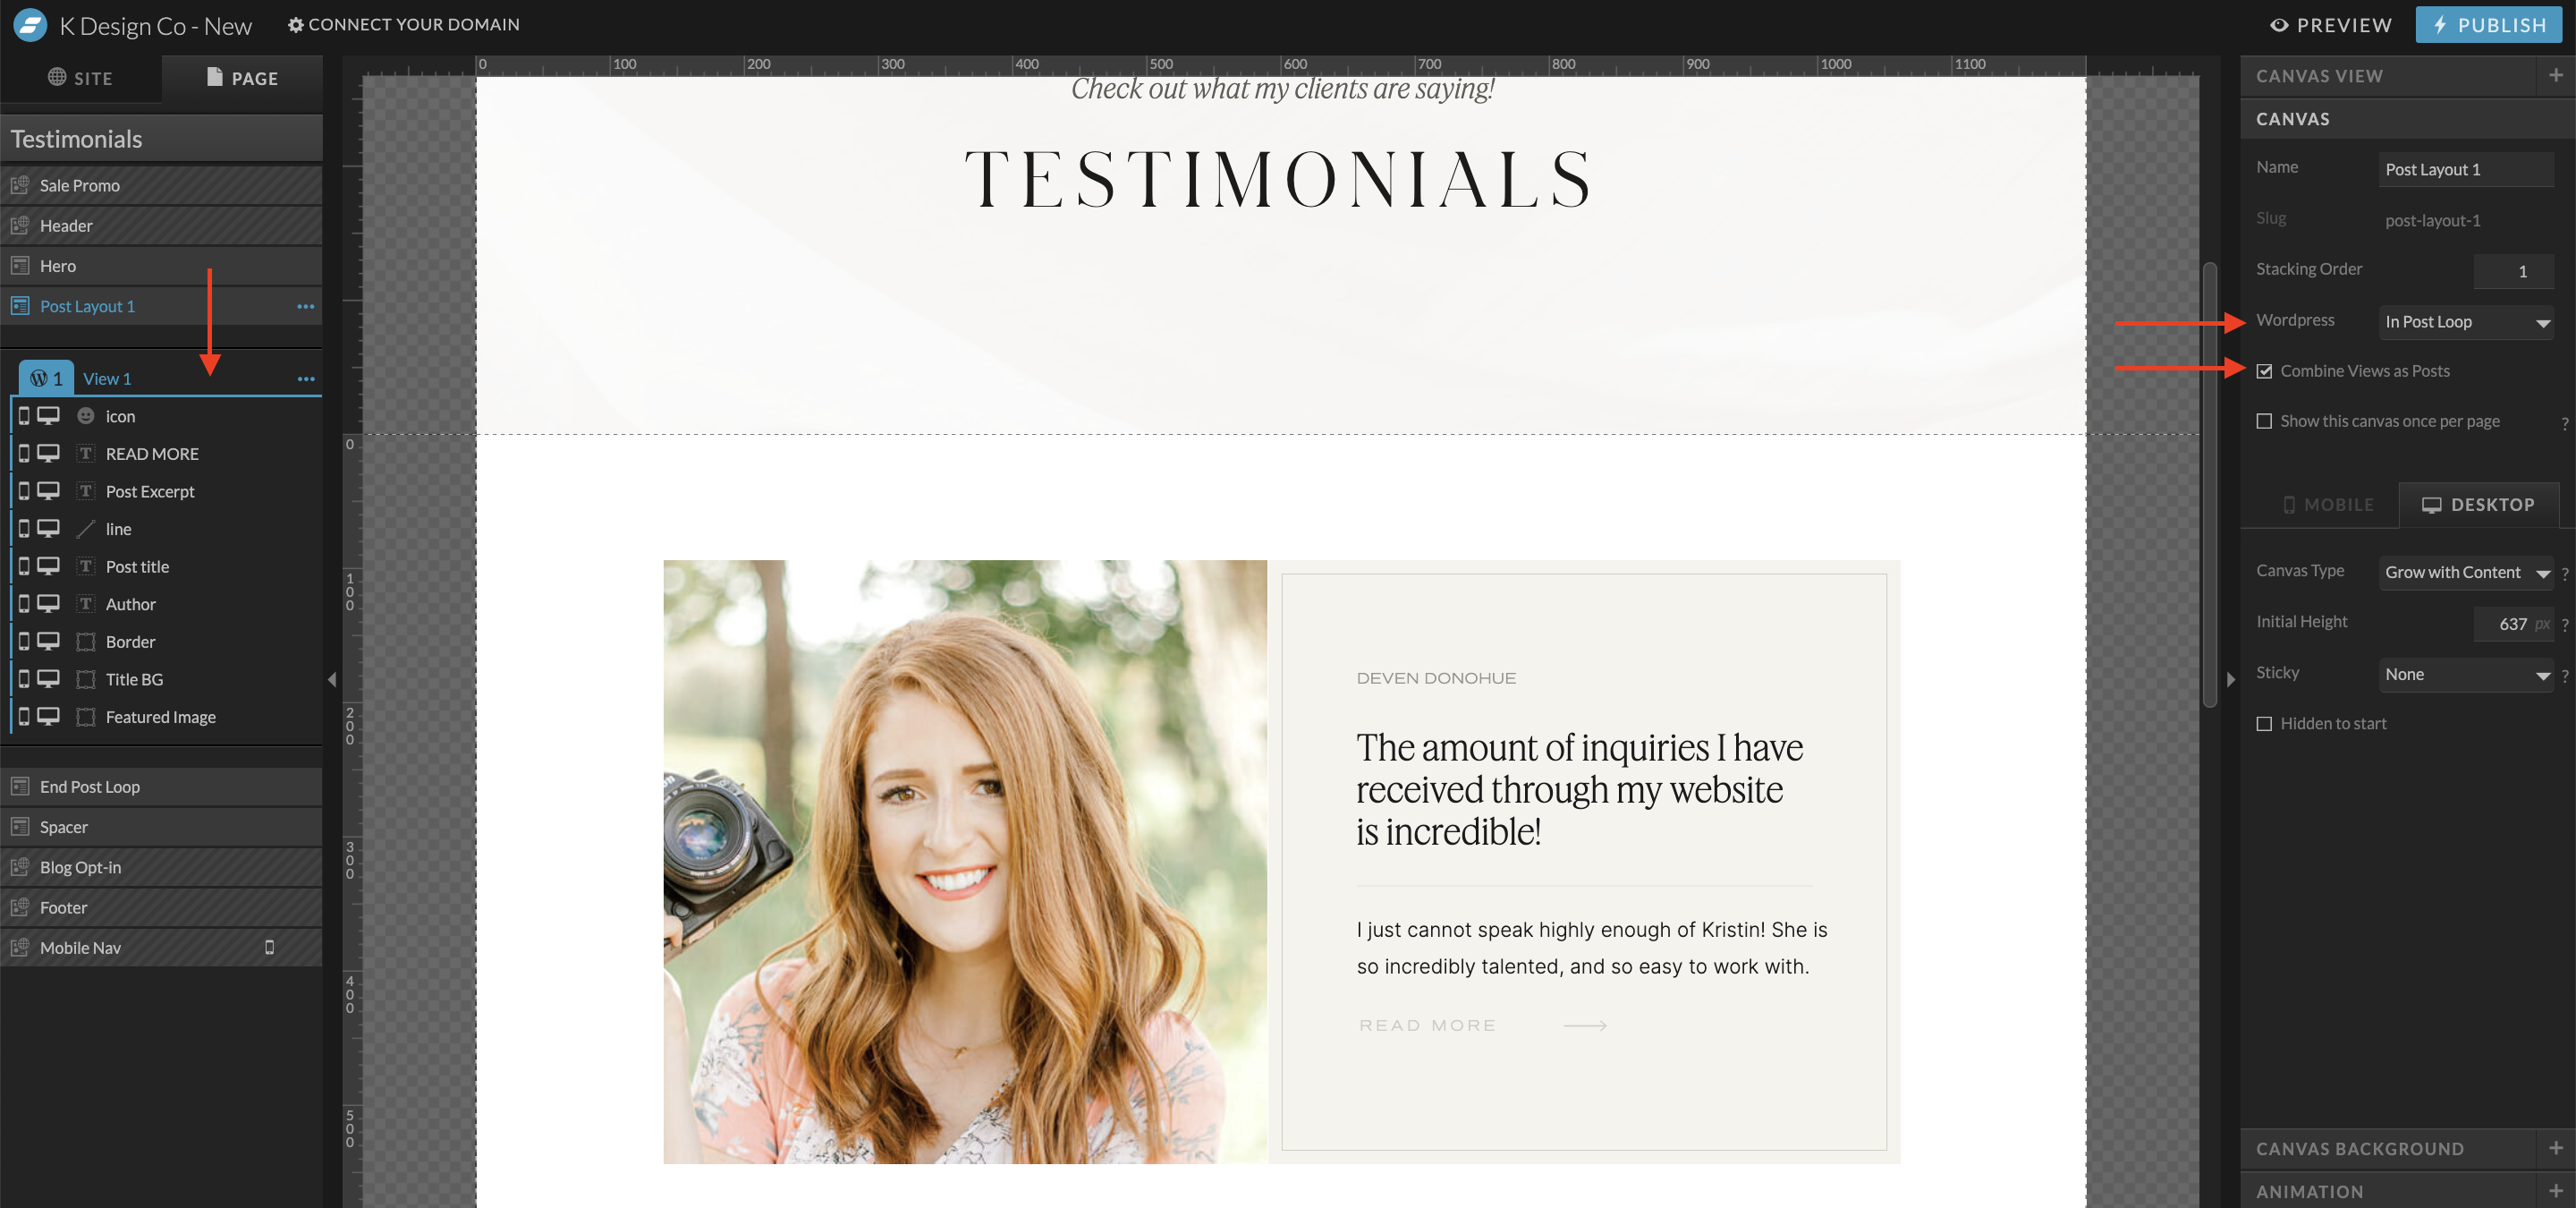
- Once you are sure you have all the elements per post that you want to display, make sure the Canvas where you want them to load is set up with at least one Canvas view. All of your the placeholder text / image elements with WordPress placeholders, should be inside of this Canvas view folder.
Step 4: Create a Single Post Template for Your Custom Post Type in Showit
If you want to create a custom design for your individual custom posts, you will also want to create a single post page template. This will be a page to display the full content for one of your custom post types (similar to a single blog post where you are able to read an entire post).
Pro tip: If the content of your post is relatively short, you may not need or want a page dedicated to the full version. If that’s the case, then you can skip this step. By default, WordPress will use your single post blog template for any custom post types if no template exists for your custom post type.
- To create a single post template, duplicate a page design in Showit that most closely resembles the design to create a new Blog Template design. For example, I recommend duplicating your blog’s Single Post design since it already has a lot of the components and placeholders set up that you will need.
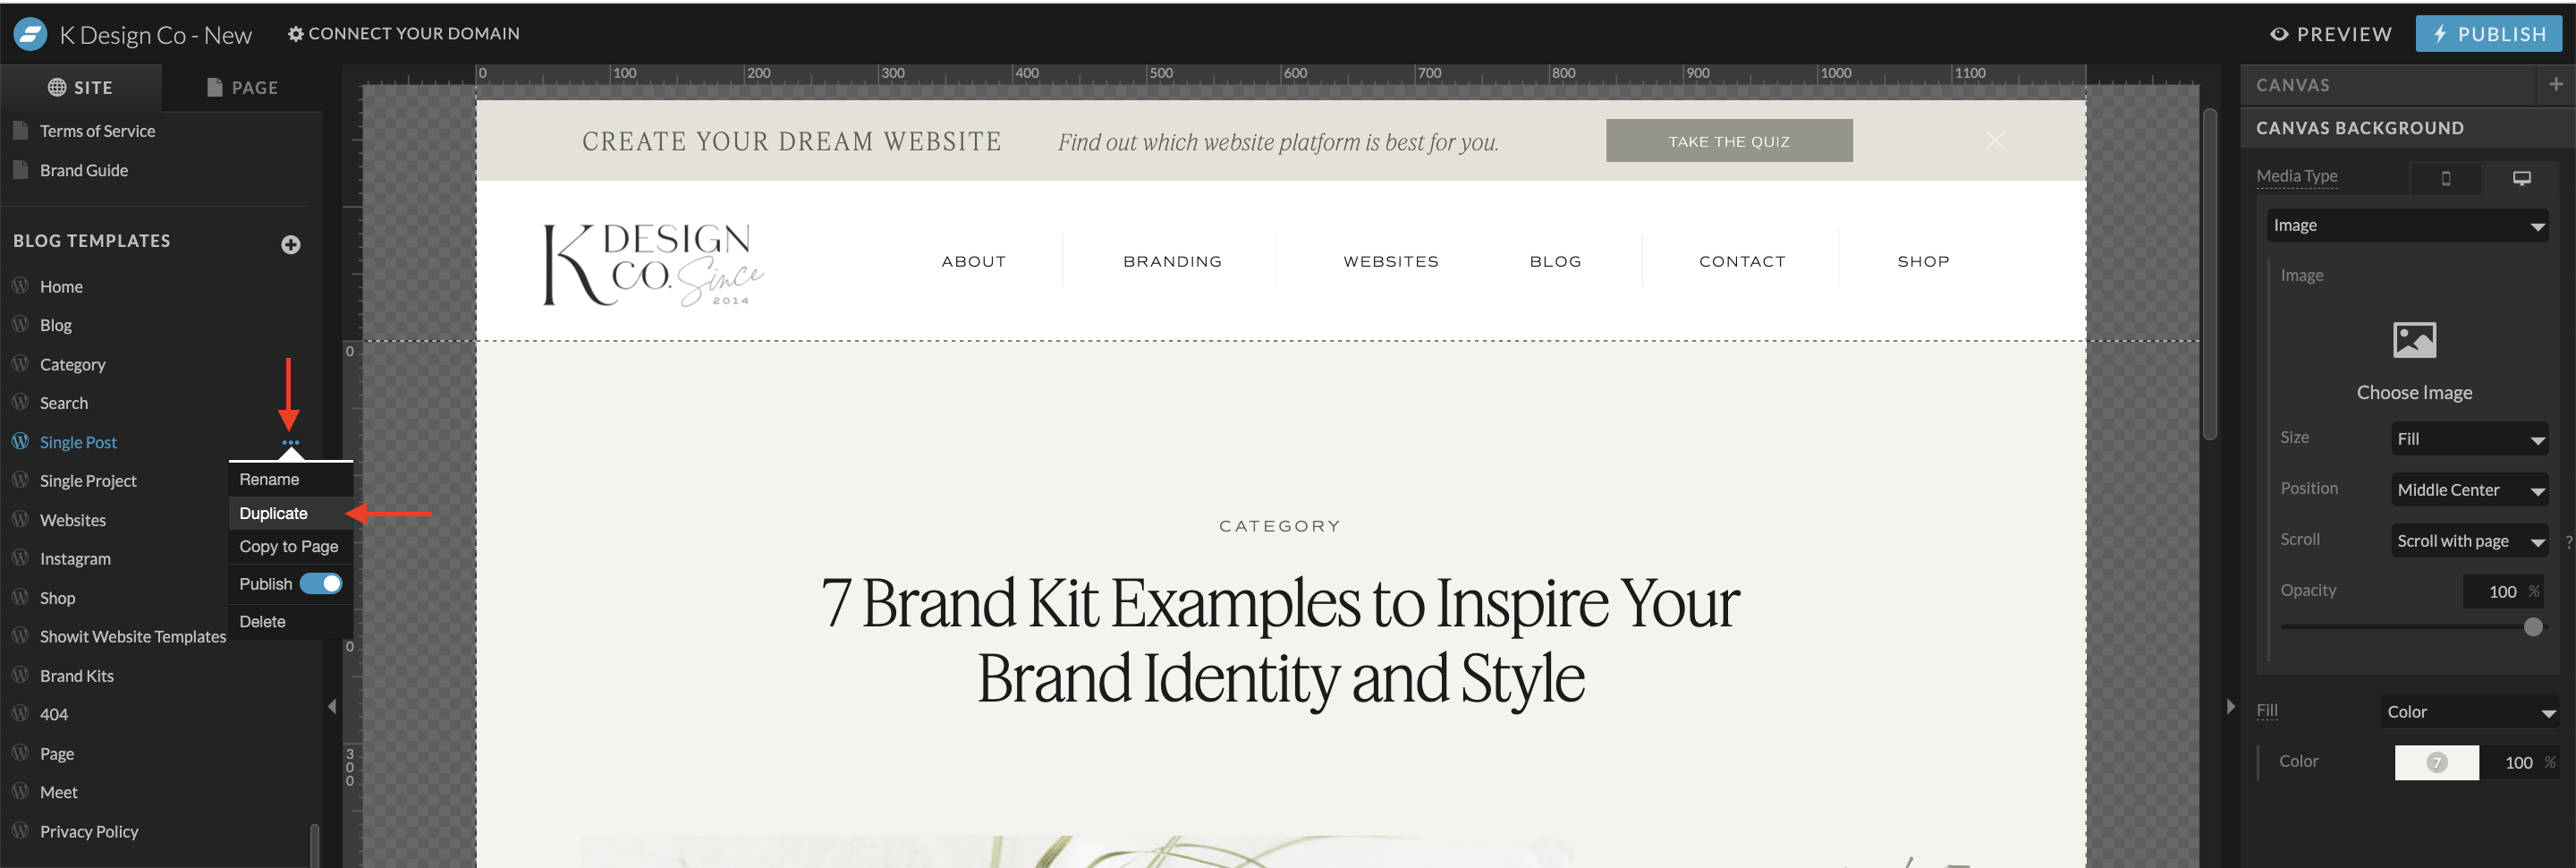
- Next rename the page to something that fits your content, ie. Single Testimonial.
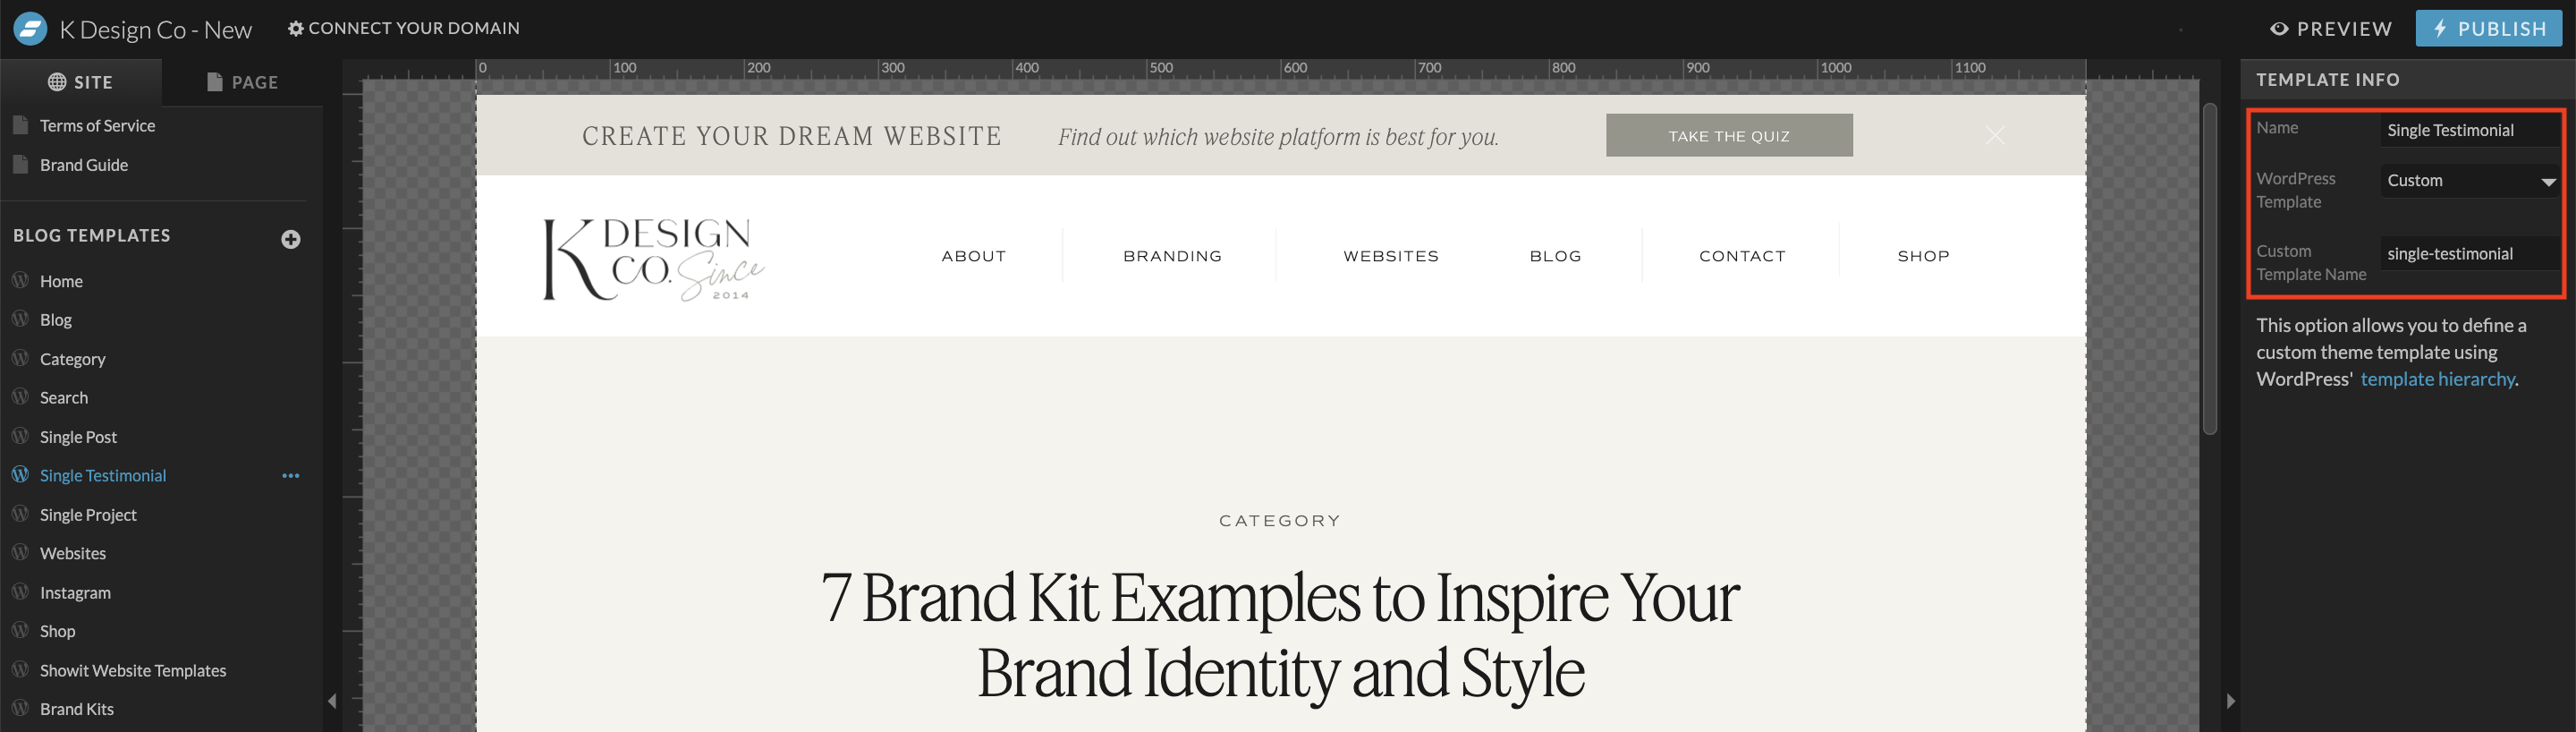
- Under Template Info on the right menu, change the WordPress Template to Custom
- Under Custom Template Name, start with the prefix “single-” and then follow it with the slug name of your custom post type, for example: single-testimonial. (Keep it all lowercase and use hyphens instead of spaces for multiple words.)
- Now, you can finish formatting the page based on how you would like your custom posts to display. You will need to use the same WordPress placeholders (Under Text Properties) required for standard blog pages, and that we used in your single post design such as:
- Post Title
- Post Content
- Post Excerpt
- Categories / Tags
- Featured Image
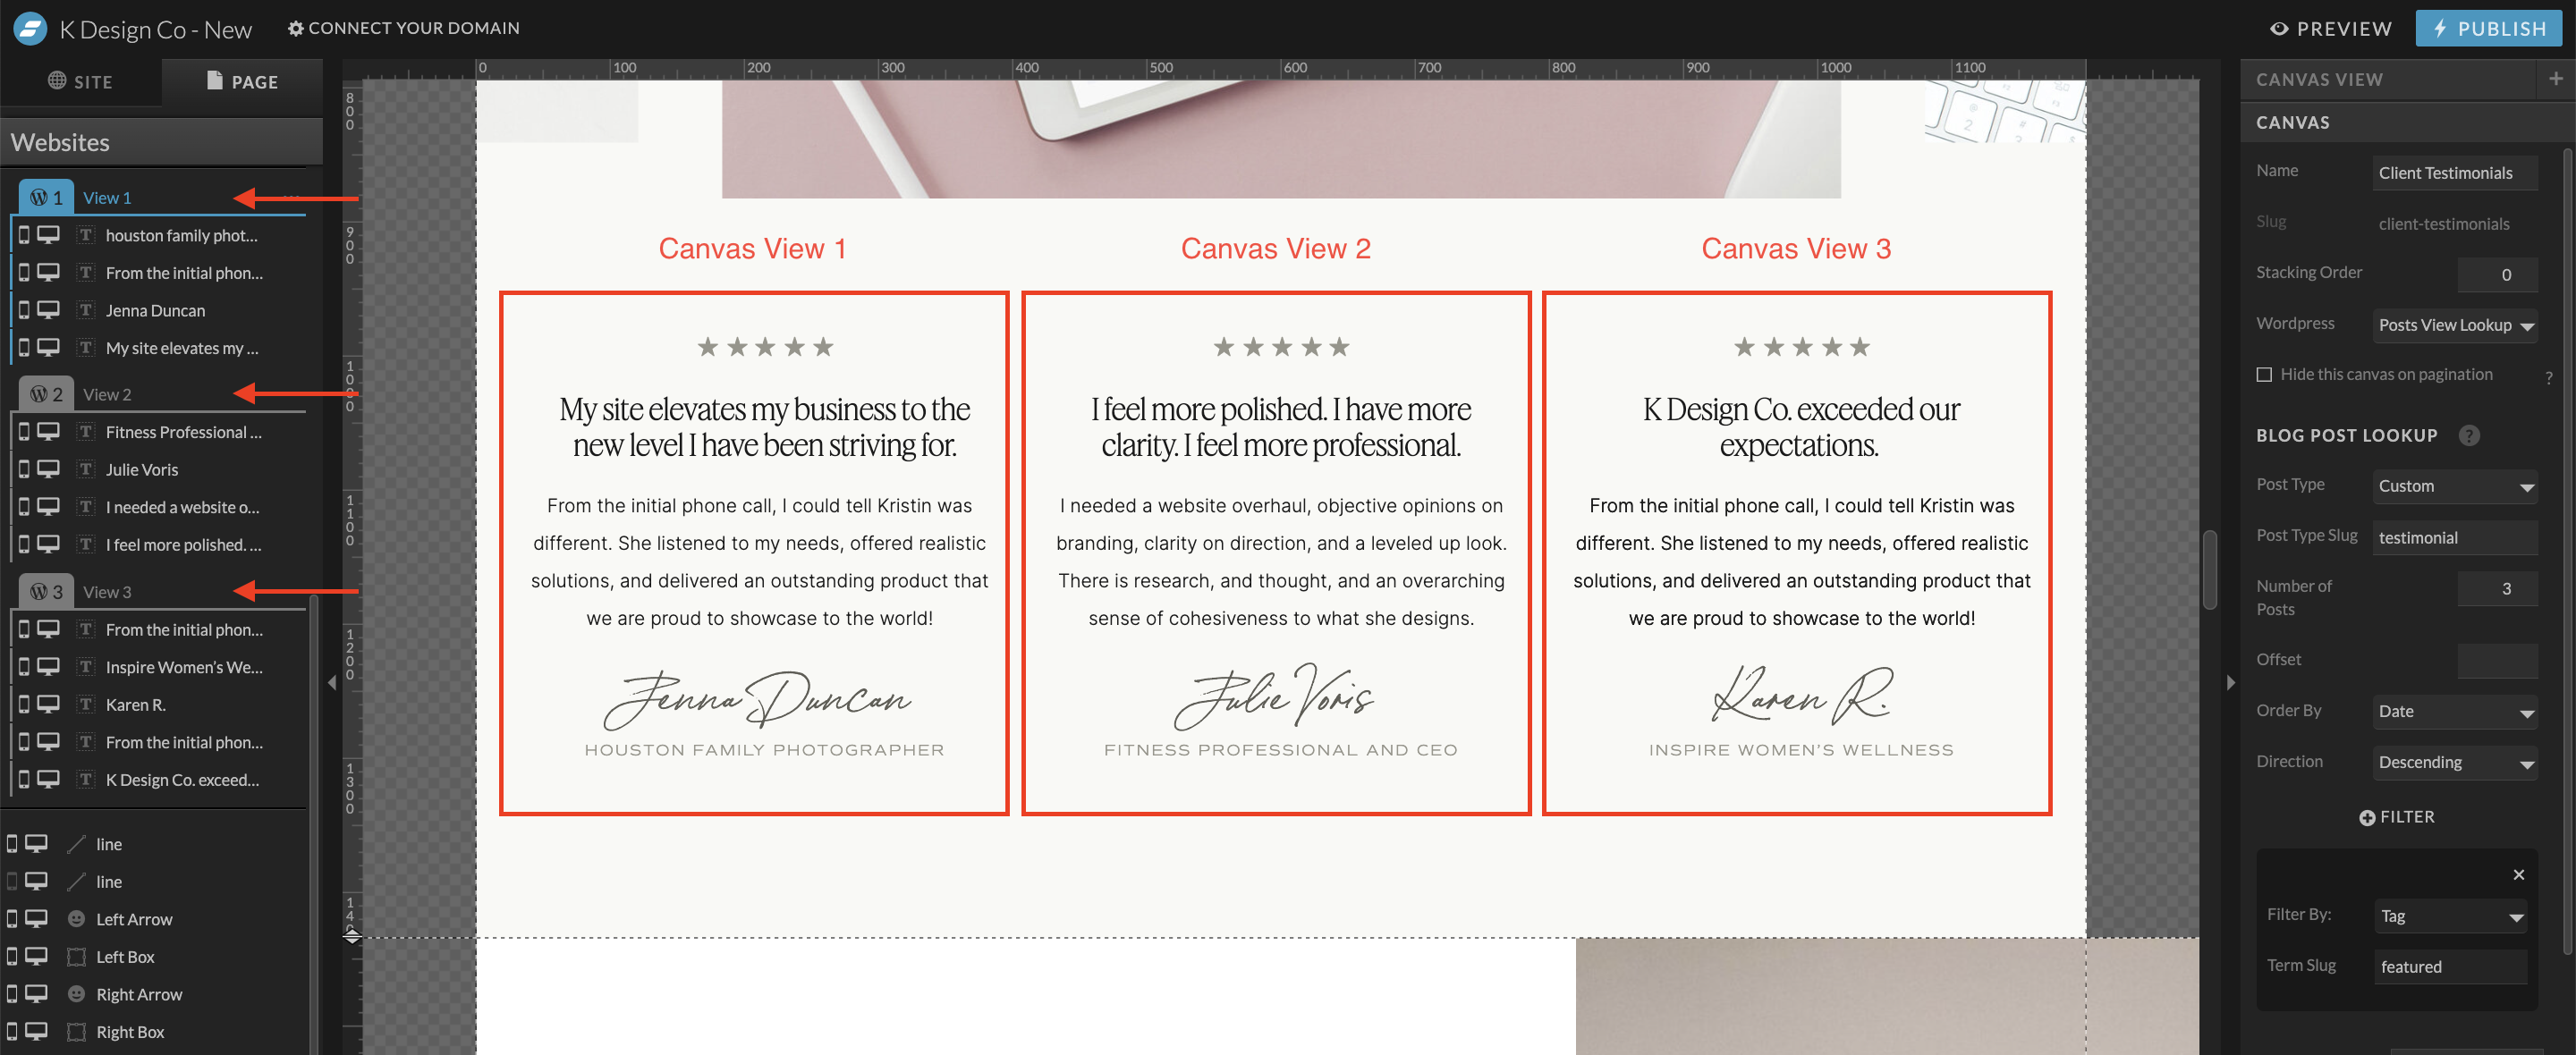
Step 5: Create a Post View Lookup Canvas in Showit
You can also feature your custom post types on other pages of your site that aren’t your post archive page such as embedded into your services page, by creating a Post View Lookup canvas in Showit.
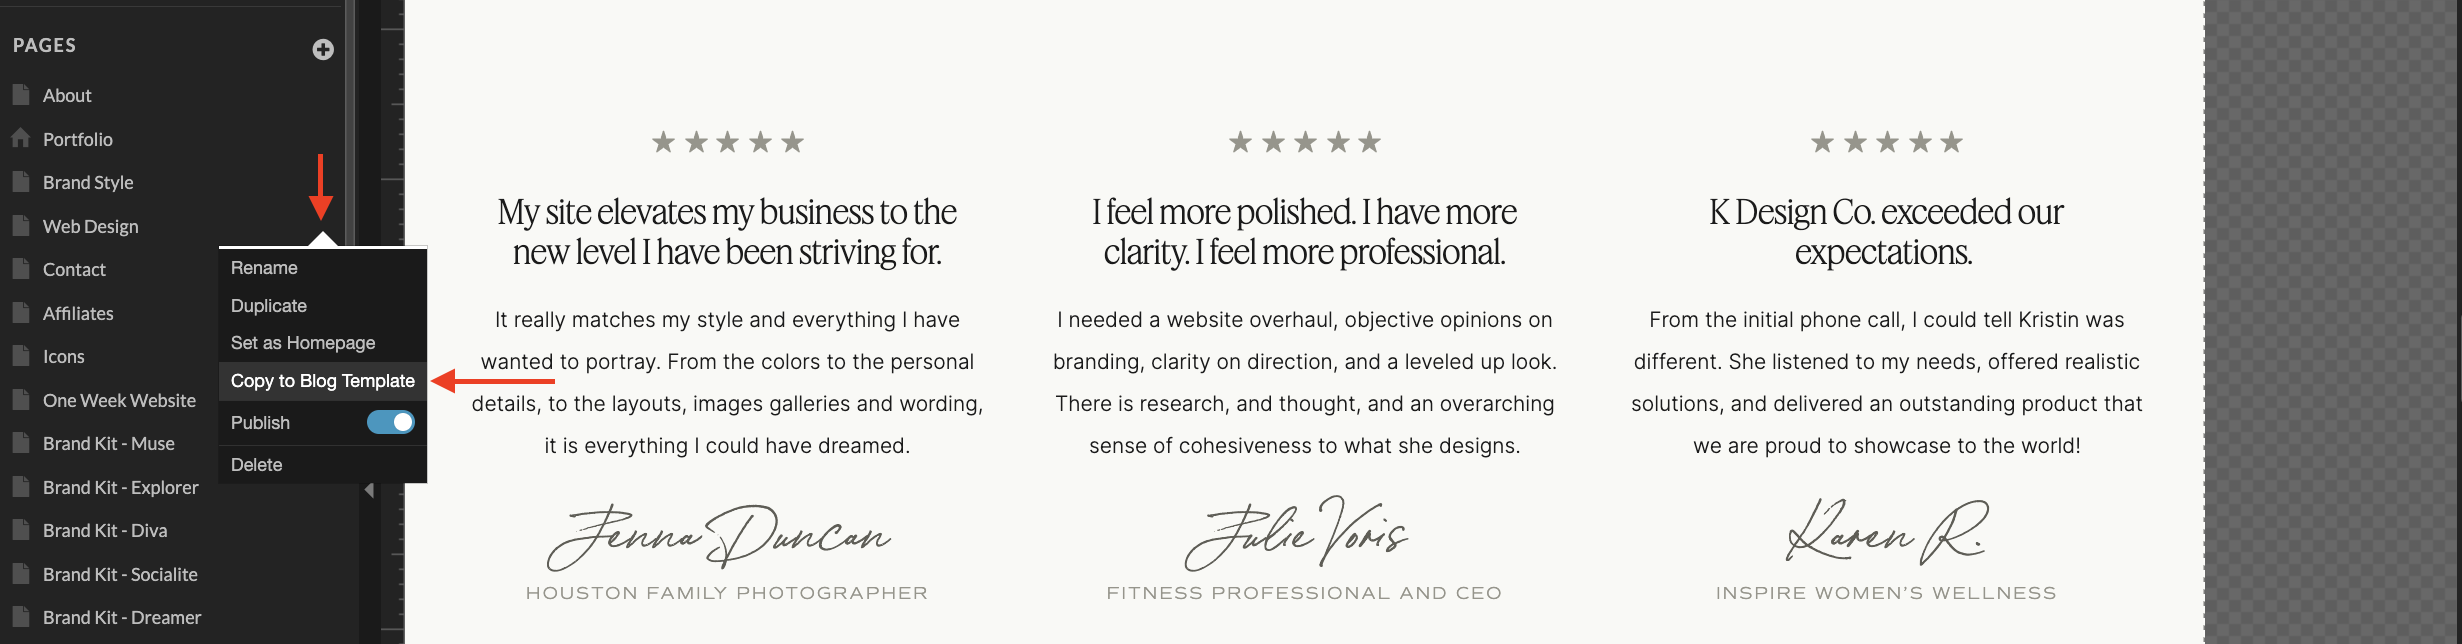
- To create a canvas with the Post View Lookup section, you must first have that page created as a Blog Template. (If you only have static Page design, it won’t work.) You can copy any page you want to add this section on in Showit by clicking the […] and select Copy to Blog Template.
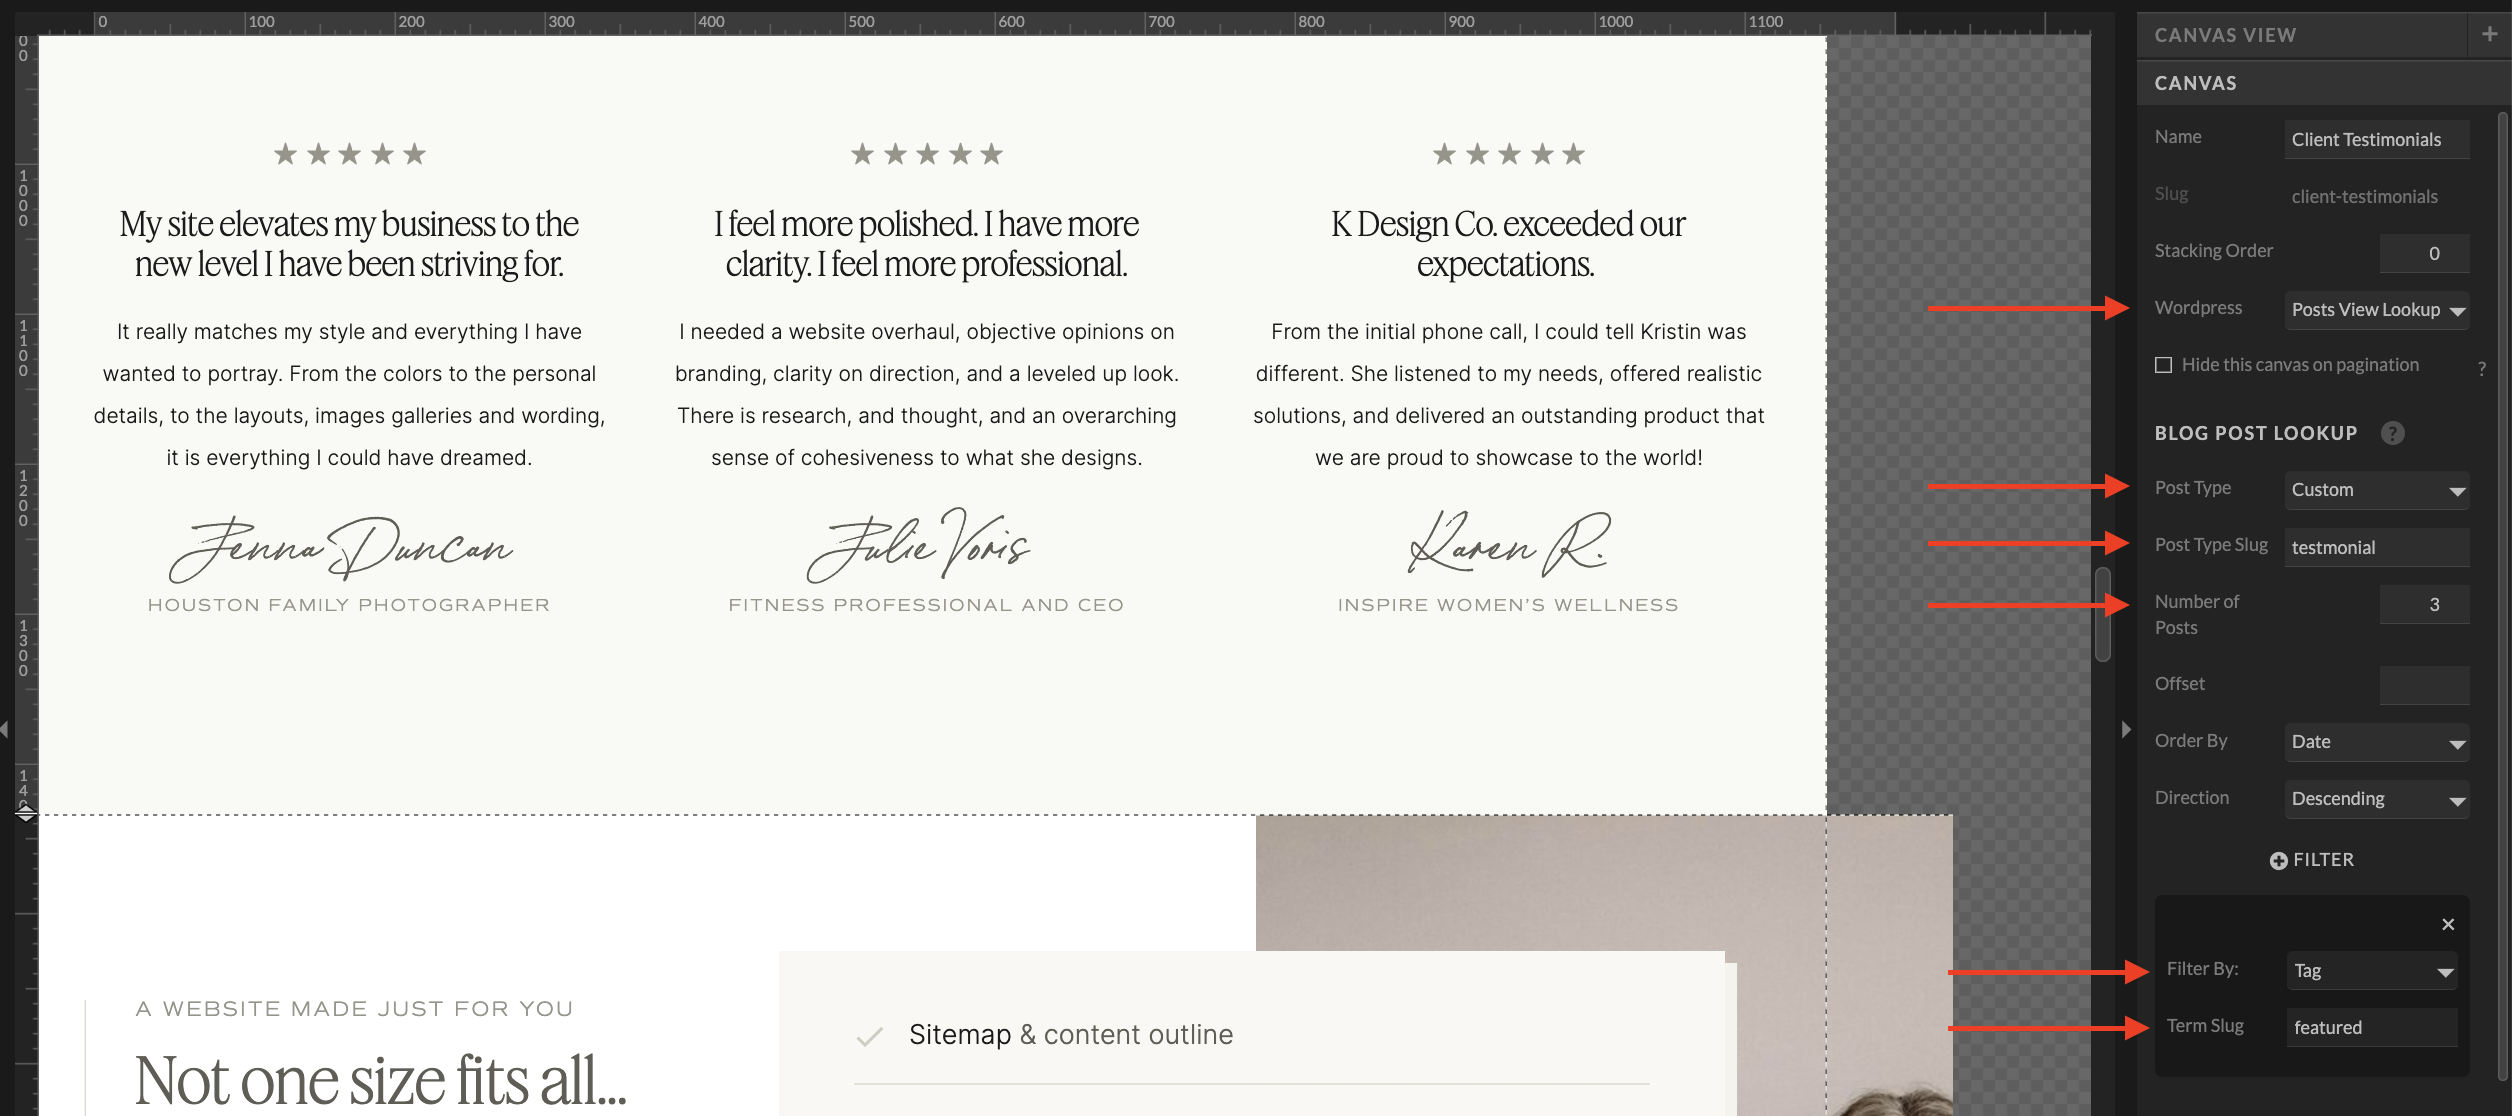
- Now, on your new “Blog Template”, you can create a canvas that will allow you to load in ANY custom post type content. Define the settings on your Canvas similar to the example below, however you will change the Post Type Slug to match the custom post slug you set up. You can set the number of posts to the number you have defined in your layout. (Or if you want more, you can add an icon arrow, that has a Click Action to “View Next Canvas” to enable “paging” to display multiple “pages” of posts.) You can also use the Filter By setting to only pull in posts with a certain tag or category in WordPress.
- Then, separate each post’s content into its own Canvas View folder and assign WordPress placeholders to the text components under Text Properties.
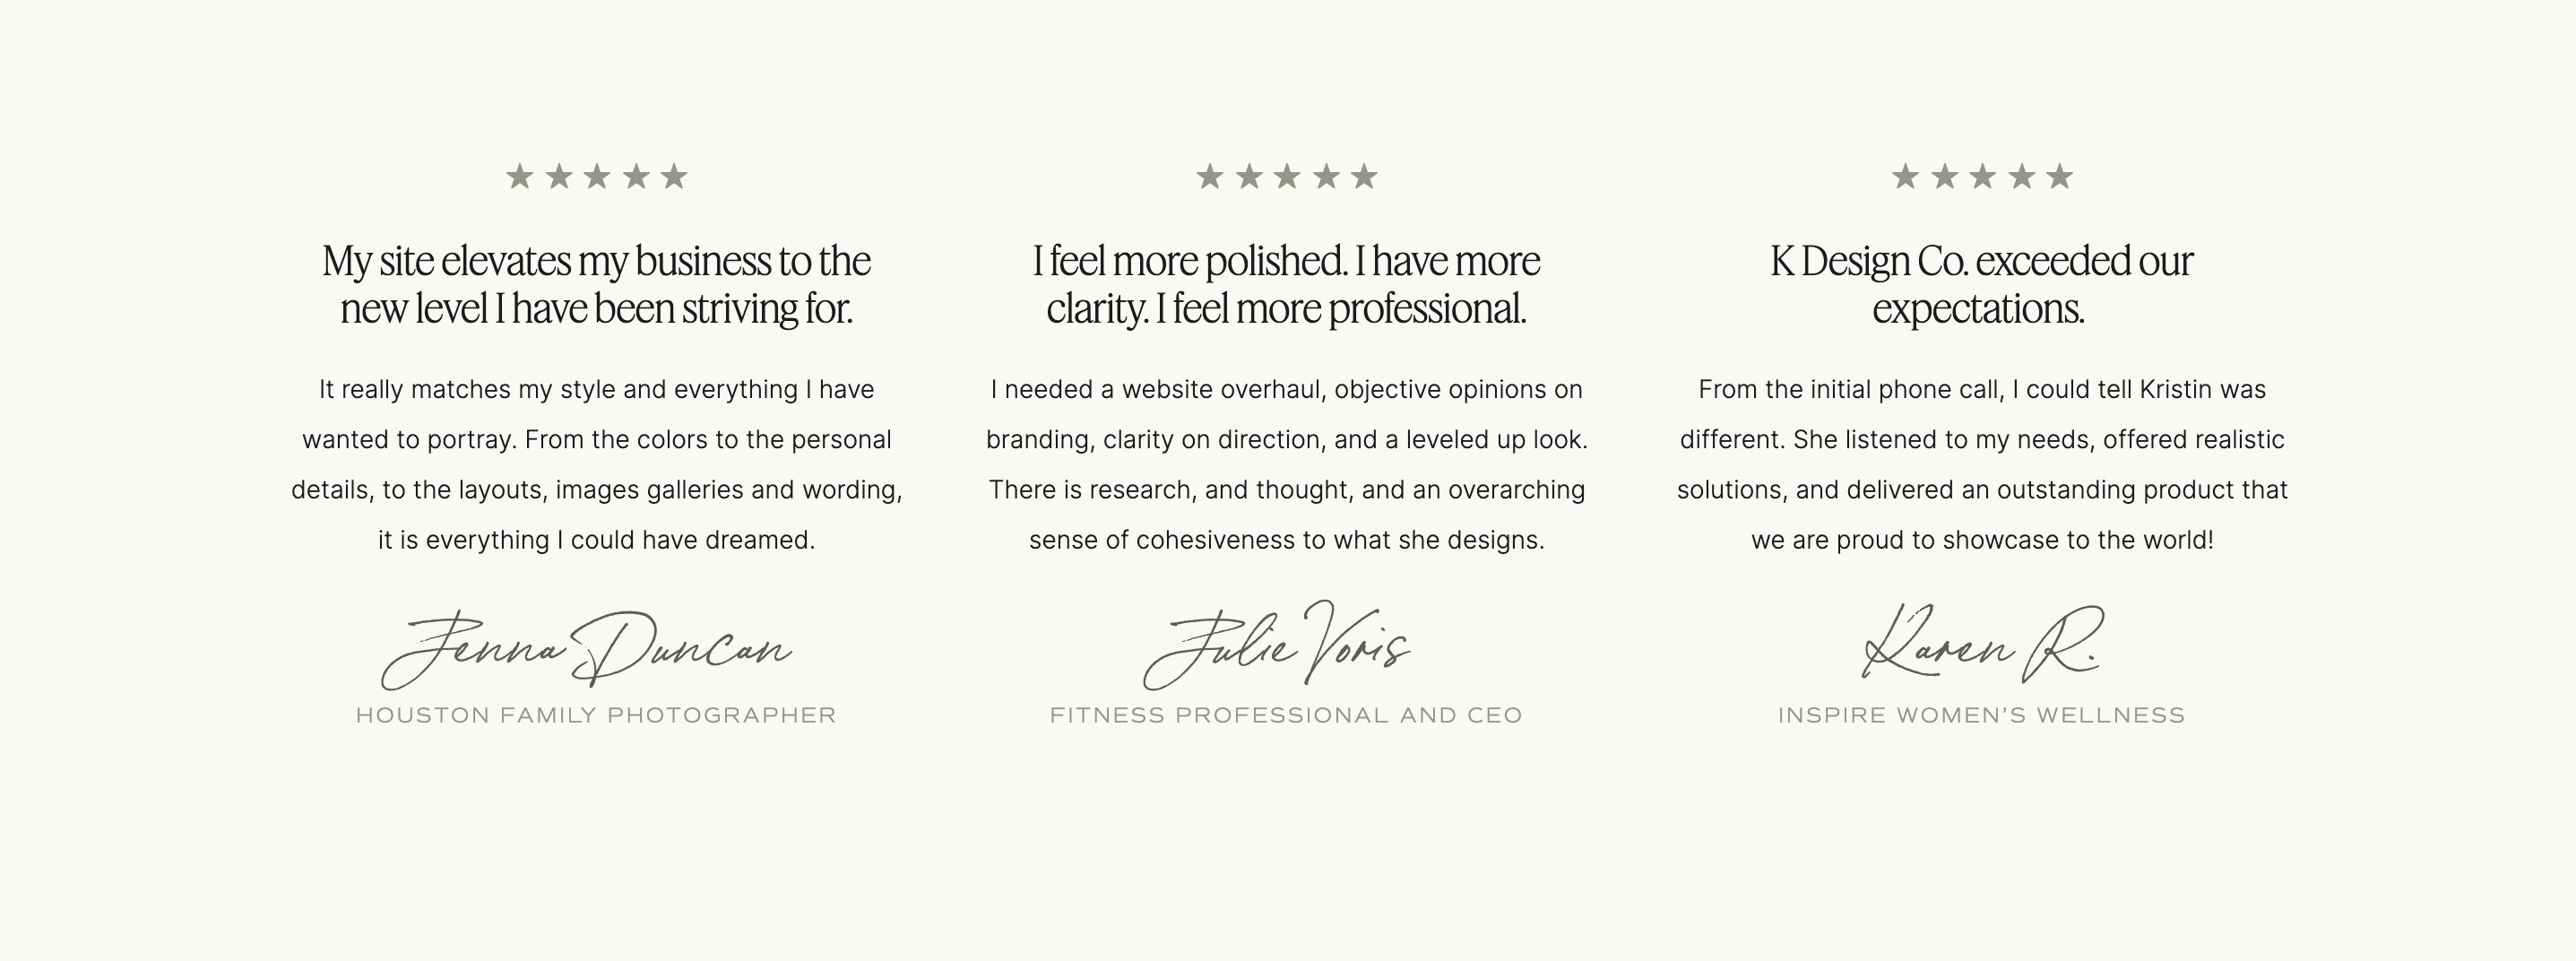
Formatting Your Custom Post Type Content
You might be thinking, what if I want to include more content than what I have placeholders for in WordPress? To achieve more varied formatting for different elements, you can get creative with which WordPress placeholders you use.
For example, you could use the Post Title placeholder for the testimonial author’s name or the first sentence of the testimonial. Or you could create WordPress users with an Author role for each of your testimonials and leverage the Post Author placeholder for the person’s name. You could also use the Post Excerpt field if you need an additional type of formatting / elements to display.
Don’t forget you can also utilize formatting from WordPress’s built in styling for H1-H6 pulled from Showit (and other Gutenberg blocks) to style anything inside of your Post Content.
You could even put all of each post’s content inside of the main Post Content field and then use HTML/CSS to define specific spans and classes for your content in WordPress. For example, if you click the three dots […], and select Edit HTML in WordPress on your paragraph block, you can edit the HTML directly in WordPress to add classes or spans around the content.
Disclaimer: I would consider this a more advanced technique since it involves code, but you can stick with the pre-defined placeholders and formatting in Showit if you don’t feel comfortable with that.
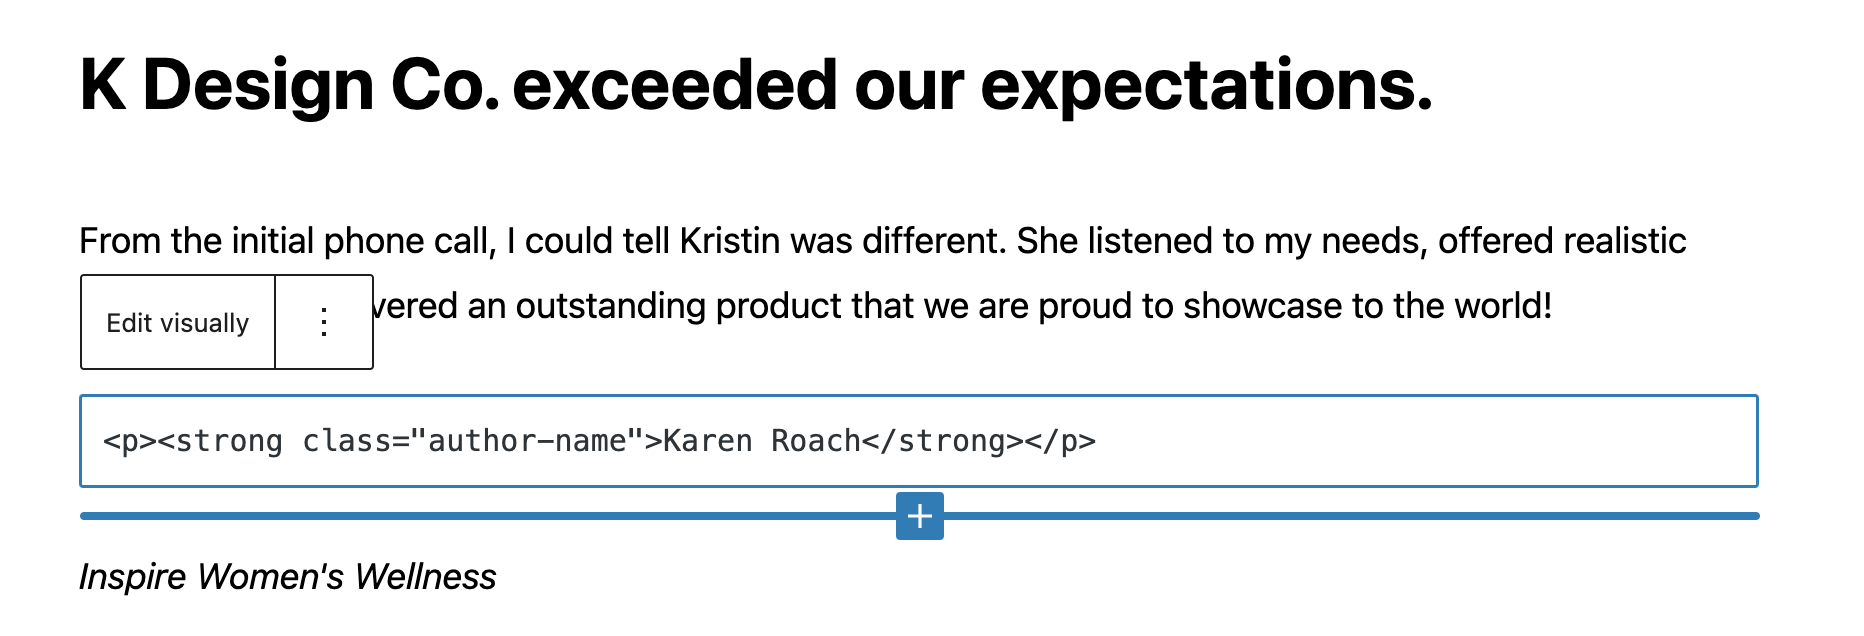
You can edit the the classes and the CSS properties to fit your content and your desired formatting, but here are some ideas to get you started…
HTML:
<span class="testimonial-text">"Main quote text."</span>
<strong class="author-name">Author Name</span>
<span class="author-title">Author Title / Title</span>
CSS:
.testimonial-text{
font-family: sans-serif;
}
.author-name{
font-family: script;
font-size: 1.5em;
}
.author-title{
text-transform: uppercase;
font-size: .7em;
}- Once you have all your WordPress placeholders defined, you can publish your design to test the integration and confirm that everything is displaying / formatting as expected.
Troubleshooting your custom post types:
If you run into an issue where your custom posts aren’t loading properly on your archive page, double-check you have that page named properly in Showit and the template name has the correct settings as explained above. Usually a quick edit to your naming convention will help to resolve any issues you are having with displaying your custom posts.
Step 6: Launch Your Custom Post Types
Now that you have a WordPress Custom Post Type integrated with Showit, hopefully you’ll start to see that the possibilities and applications for their use are endless (and exciting!)
Experiment to see what creative ways you can use custom post types on your site to make it more organized and streamlined. Combining Showit with WordPress might seem a little tricky at first, but once you get the hang of it, the combination can be super powerful.
Need help with a custom post type setup and design for your site? This would be perfect VIP day project! Reach out to me here to discuss the details.