

Let’s face it. Sometimes things come up in your business that require you to assume the role of a graphic designer. You probably know already that design is not your forte, but sometimes it’s just not in the budget to hire a designer or you need a turnaround too quickly to search for one.
If you have ever had to take on this responsibility yourself, inevitably you have also faced the dreaded issue of printing. Most entrepreneurs aren’t familiar with the industry-specific knowledge and terminology that is often required to print their project error free. The worst part is that you don’t know you are doing something wrong until you get your project back from the printer and it’s not at all what you were hoping for. Ever had this happen to you?
Commercial printing can be a lot more complicated than your average desktop printer, but learning the basics can help you when you’re in a pinch. Here’s a quick overview of some common printing terms. Understanding what they mean could be the difference between printing bliss and an expensive print nightmare.
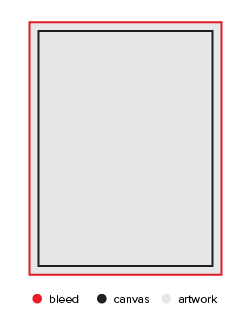
Full or Partial Bleed
The bleed for a file is an area larger than your canvas that you designate so that you can ensure printing all the way to the edge of the paper. Ever notice your desktop printer produces a white border around the edge of your paper?
Commercial printing gives you the advantage of beautiful full-page coverage. While a bleed can technically be any size, a standard size for most documents is .125in. A full bleed would entail a .125in border around the entire perimeter of your canvas, all four sides. A partial bleed would be any less than four sides.
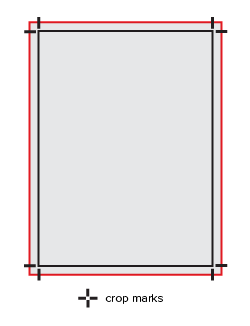
Crop Marks
Typically when you apply a bleed to your document, you will also want to add crop marks to show the printer where the bleed is located and where you would like them to cut. Adding a bleed to your document will make the final file dimensions larger, but when paired with crop marks, your final product should come out to the original size you desire. Design layout programs like Adobe Indesign have special PDF export settings that allow you to add crop marks very easily.
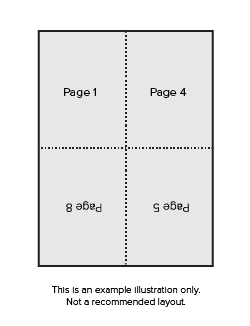
Imposition or Pagination
If you’re printing something with multiple pages, don’t make the mistake and assume that your final file will be set up with all the pages in consecutive order. The imposition is the special layout in which a printer will need to set up a multi-page file for it to print and bind correctly. For example, the order in which you would like to read a brochure will be very different than how the printer will need to position it’s pages. Also, If you’re creating a brochure or perfect bound materials, you will need to ensure that your final page count is a multiple of 4.
A printer will use large sheets of paper and print multiple pages on one sheet. In order to make the imposition process easier for the printer, it is important to export your file as single pages rather than spreads. Don’t worry – the printer will know the correct way for fitting everything together properly.
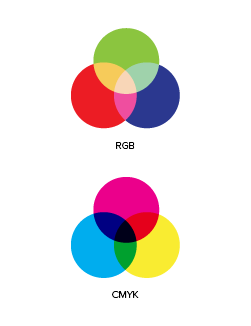
Color Models
When you are printing it’s important to ensure your file contains only appropriate colors. RGB (Red Green Blue) colors are suitable only for digital display and can produce undesirable results when printed. CMYK (Cyan, Magenta, Yellow & Black) and PMS (Pantone Matching System) are the appropriate color models you should use for printing.
If you have pulled an image from the Internet, it’s likely RGB and will need to be converted into CMYK using a program like Adobe Photoshop. Adobe Indesign’s built-in Preflight feature can warn you if your file contains inappropriate colors for printing.
Resolution
Printing with crystal clear quality will require you to have proper resolution set-up especially when dealing with photographic images. For most standard printing, a proper resolution is 300dpi/ppi (dots per inch/pixels per inch) in PDF format is acceptable. However, if you are printing a huge billboard or banner, the resolution required could be considerably less such as 150dpi.
The proper resolution will be dependent on the final format. To determine the resolution of an image you can use the Photoshop Image Size feature. You can also ask your printer for a hard copy proof to ensure everything is printing as you expected.
Have a question about setting up your files for perfect printing? Contact K Design Co. for help.